Documentation
May 12, 2025
30min read

Introduction
Welcome to the Catalogic Installation Guide. This document provides step-by-step instructions for installing and configuring Catalogic, a tool that allows you to define and manage product catalog configurations using a Google Spreadsheet — and then publish those configurations directly into your connected Salesforce org.
Catalogic consists of two main components:
A Google Spreadsheet where the catalog configuration is defined and managed
Business logic in Salesforce that processes the spreadsheet data and creates or updates catalog configuration records
Installation Overview
The installation process includes the following key activities:
Deploying Catalogic’s business logic to Salesforce (using Salesforce packages) 📦
Creating your own copy of the Catalogic spreadsheet :google-sheets:
Connecting the Catalogic spreadsheet to your Salesforce organization 🔗
Once these steps are complete, you’ll be able to use the spreadsheet to define catalog data and seamlessly push it to Salesforce. Time required to complete the process is between 15 minutes and 30 minutes.
Submit Catalogic Access Request
If you have not yet, request access to Catalogic by submitting a request via Catalogic contact us form. Once processed, you will receive the Getting Started email with:
Link to the installation instructions (this document)
Link to the Catalogic spreadsheet template
Link to the packages to install on your org
Prerequisites
Before you begin the installation, ensure the following conditions are met:
A target Salesforce organization is available. This can be a production, sandbox or developer edition org. Catalogic works great on demo and trial orgs provided by Salesforce to their partners (e.g. Revenue Cloud Advanced trial org)
Salesforce OmniStudio is installed and configured:
You have System Administrator-level access to the target Salesforce organization. You will need this to install packages, create and manage connected apps, test connection, etc.
Catalogic Deployment to Salesforce
We use two packages to package and distribute the Catalogic app on Salesforce. While our goal is to consolidate everything into a single managed package (so it is very easy to install), some metadata types — such as DataRaptors, Integration Procedures, and Data Mappers — are currently not supported in managed packages by Salesforce. As a result, we maintain a second package to deliver those components until full support becomes available
Install “Catalogic for RCA” Package
Locate the latest Catalogic for RCA package ID on this page
Install the located package in your Salesforce org:
Install “Catalogic for RCA - OmniStudio - Unlocked” Package
Locate the latest Catalogic for RCA - OmniStudio - Unlocked package ID on this page.
Install the located package in your Salesforce org:
Create “Catalogic” Connected App
Go to Setup
Navigate to App Manager
Click “New Connected App”
Fill in Basic Information
Enable OAuth Settings
Set OAuth Configuration
Proof Key for Code Exchange (PKCE)
Leave All Other Settings at Default
Save
After saving, it may take 2–10 minutes for the connected app to be fully available
Once the deployment is complete, you’re ready to move on to the next step: connecting your Catalogic spreadsheet to the Salesforce org.
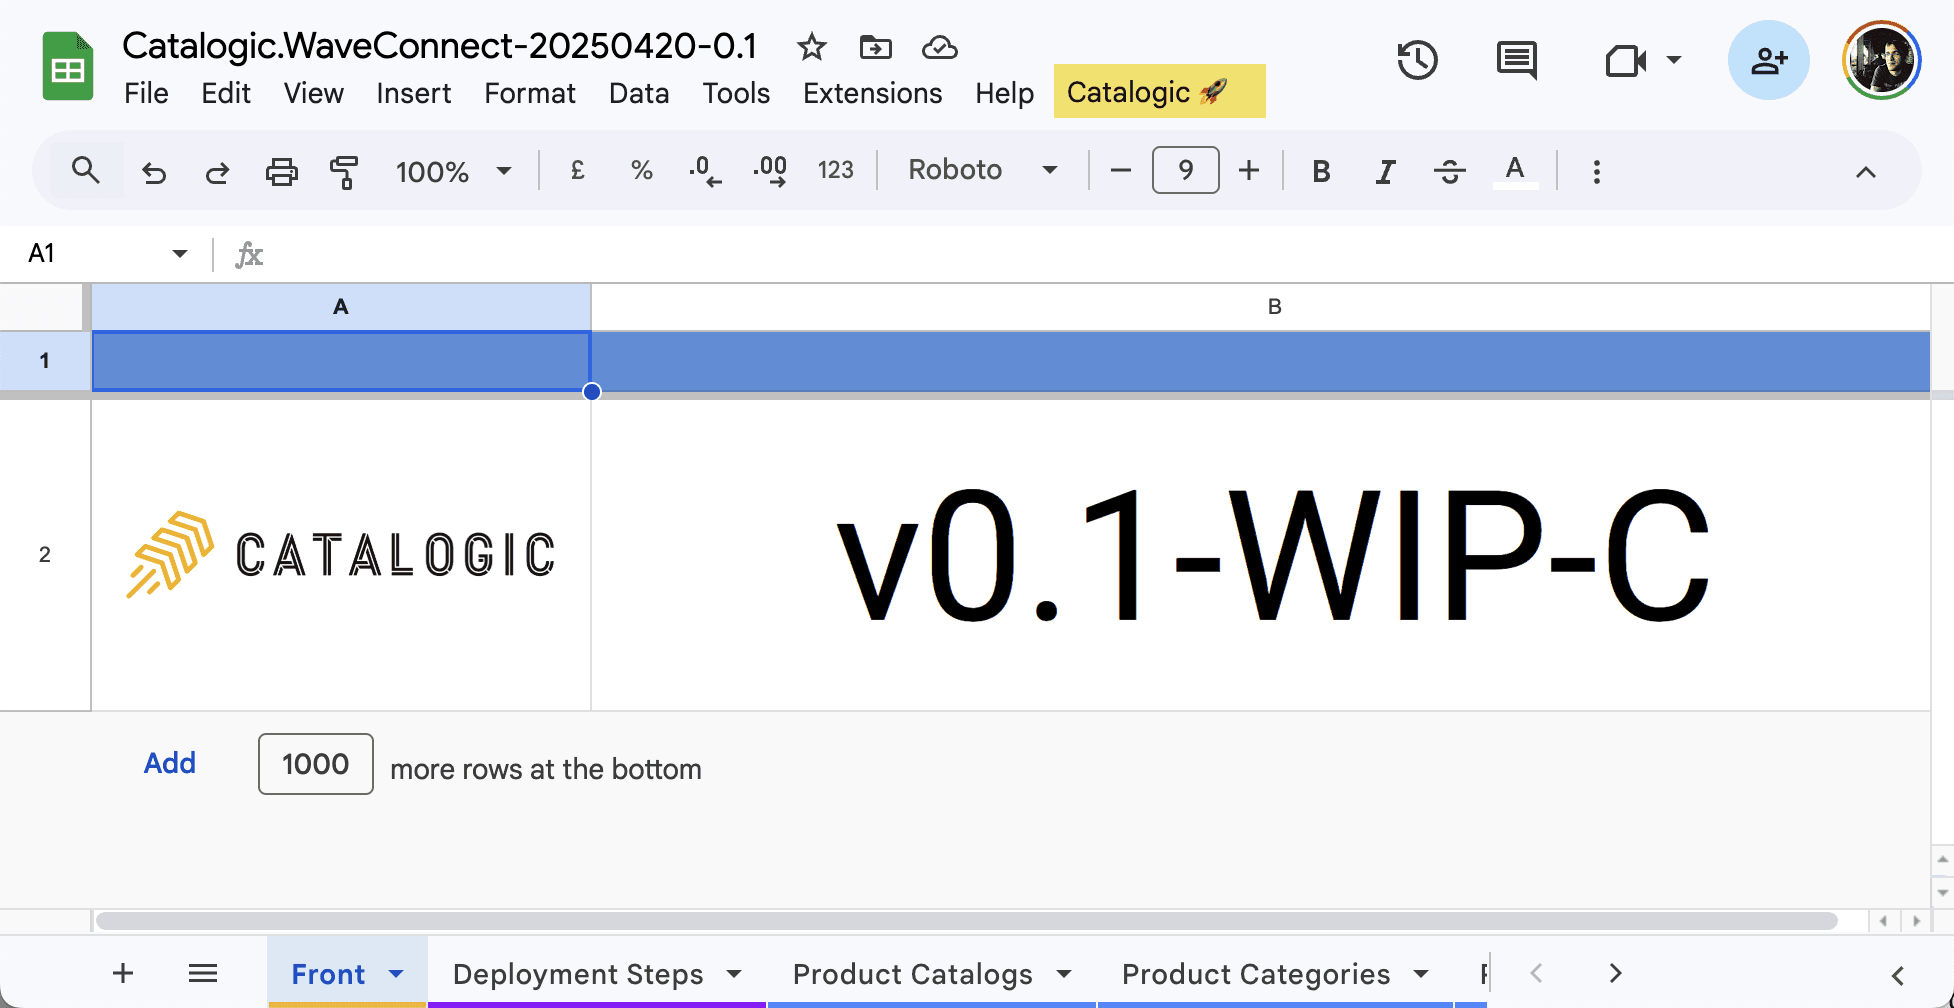
Getting Your Own Catalogic Spreadsheet
To begin working with Catalogic, you’ll need your own personal copy of the Catalogic spreadsheet. This copy will be based on our template and created under your Google account.
1. Locate the latest Catalogic Client spreadsheet template
This is a preconfigured template that serves as the foundation for your catalog configuration. Get the latest template from the table below
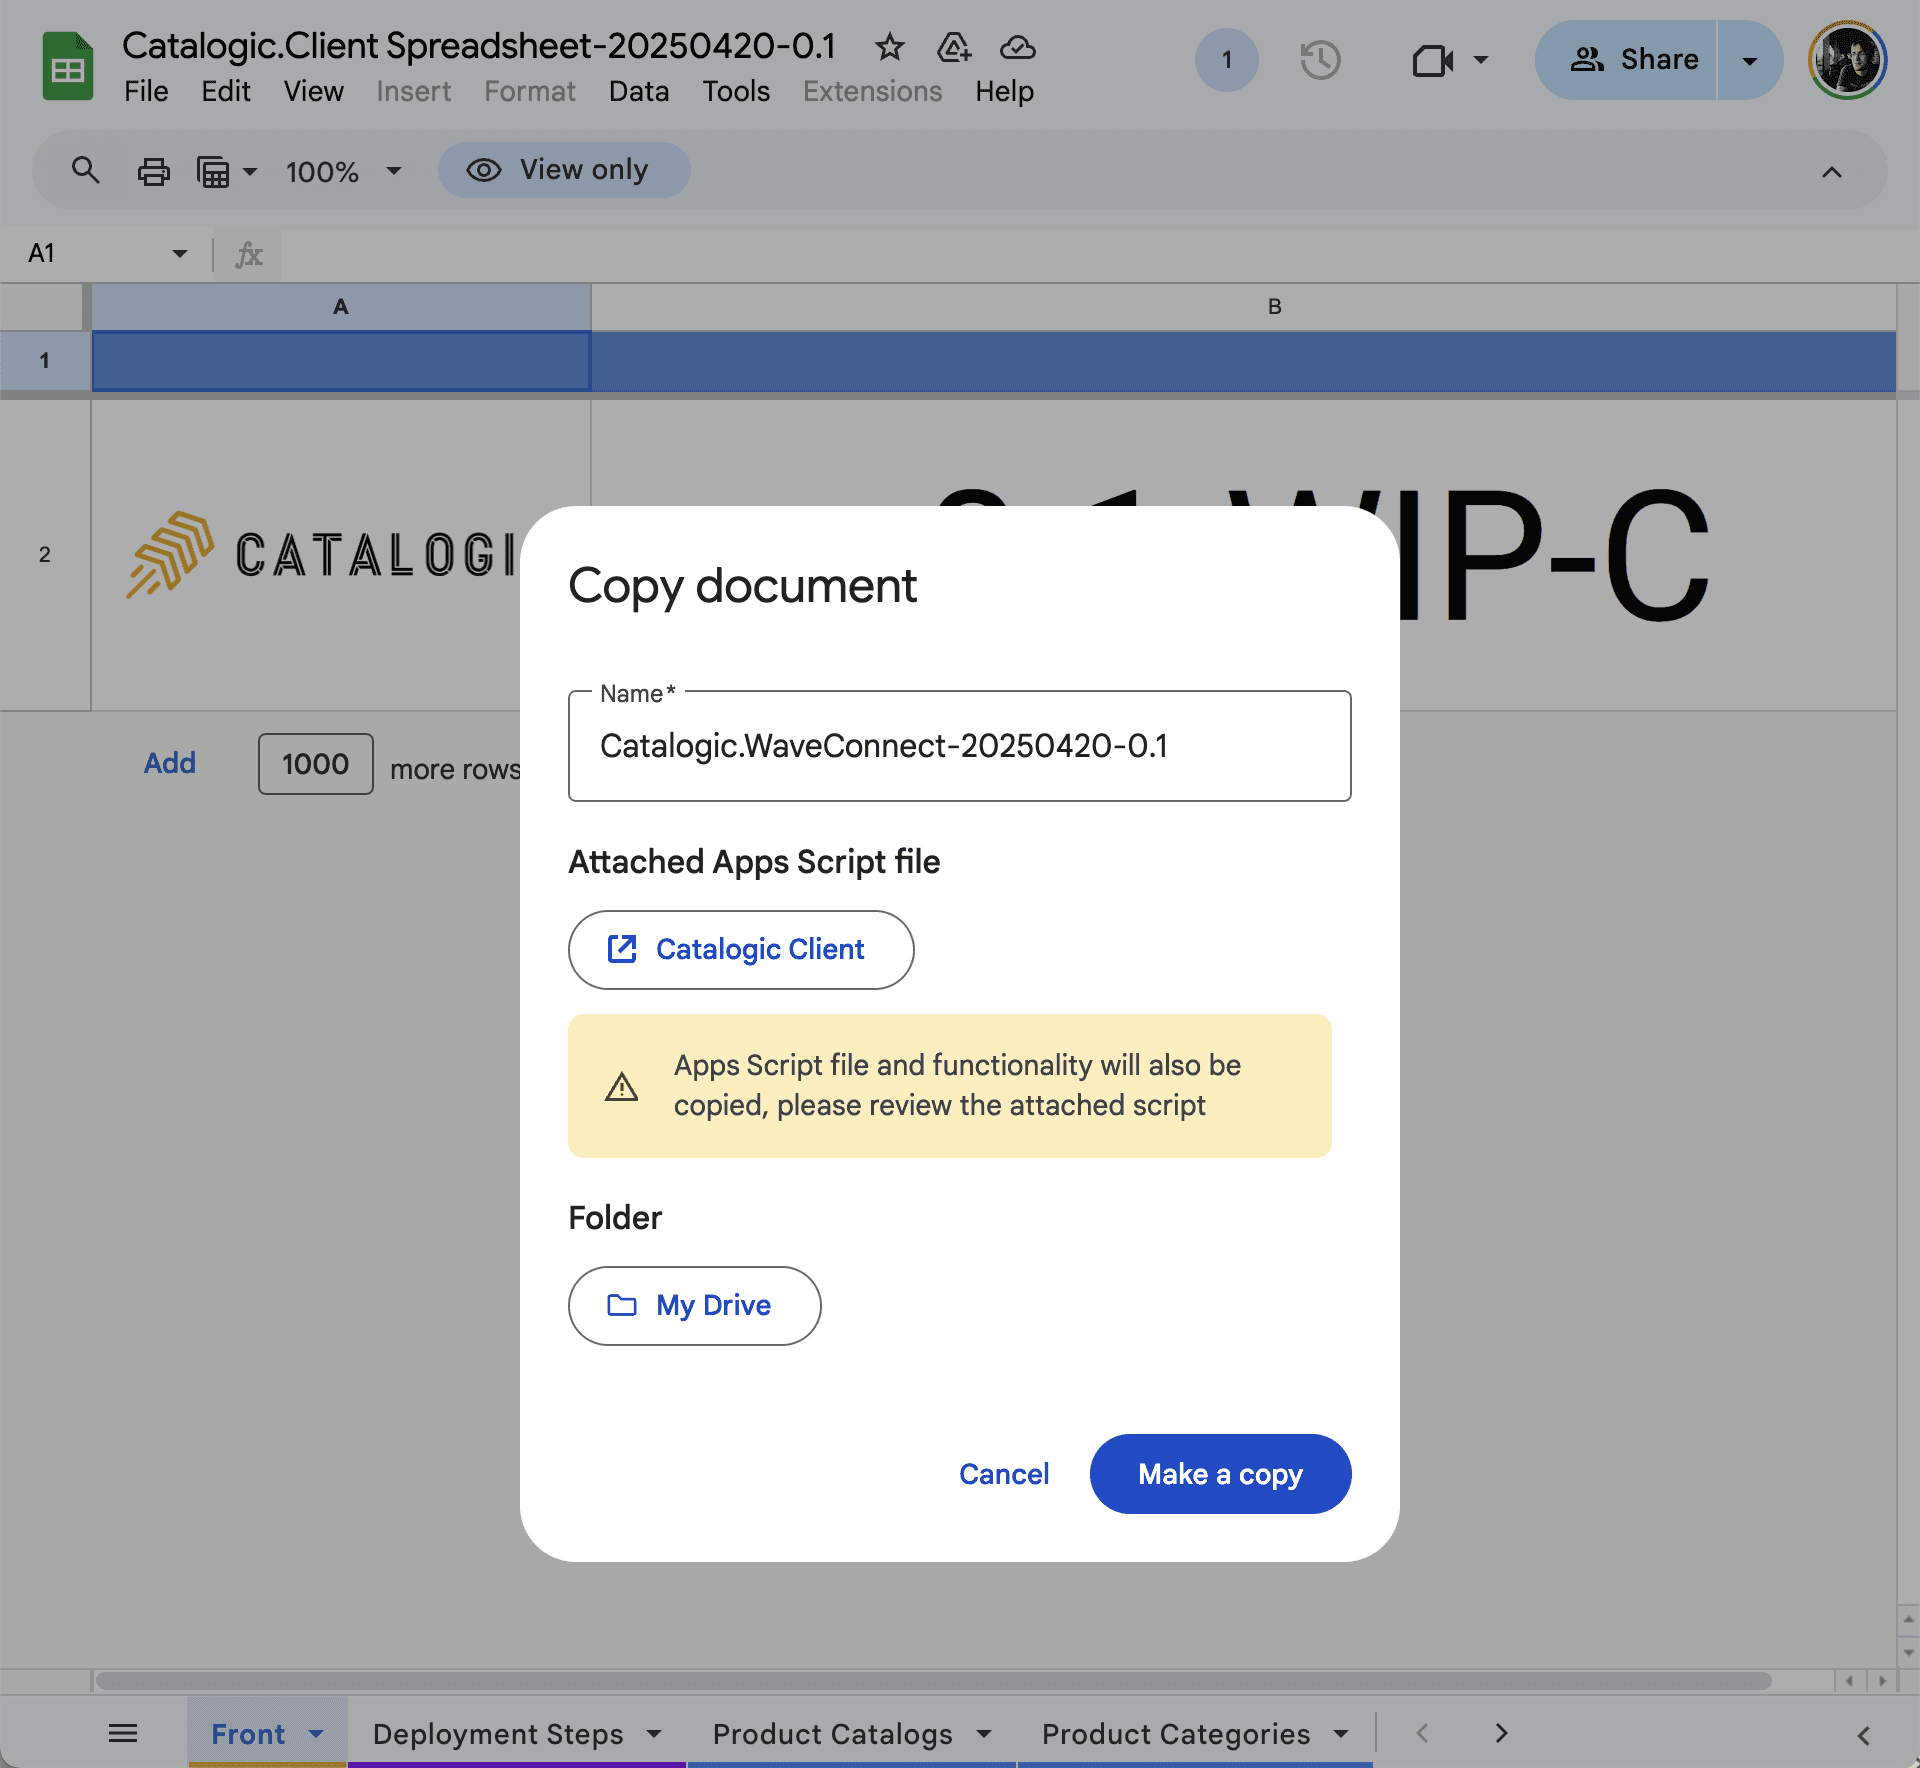
2. Create your personal copy of the Catalogic Client template
Open the shared template and go to the menu bar: File > Make a copy
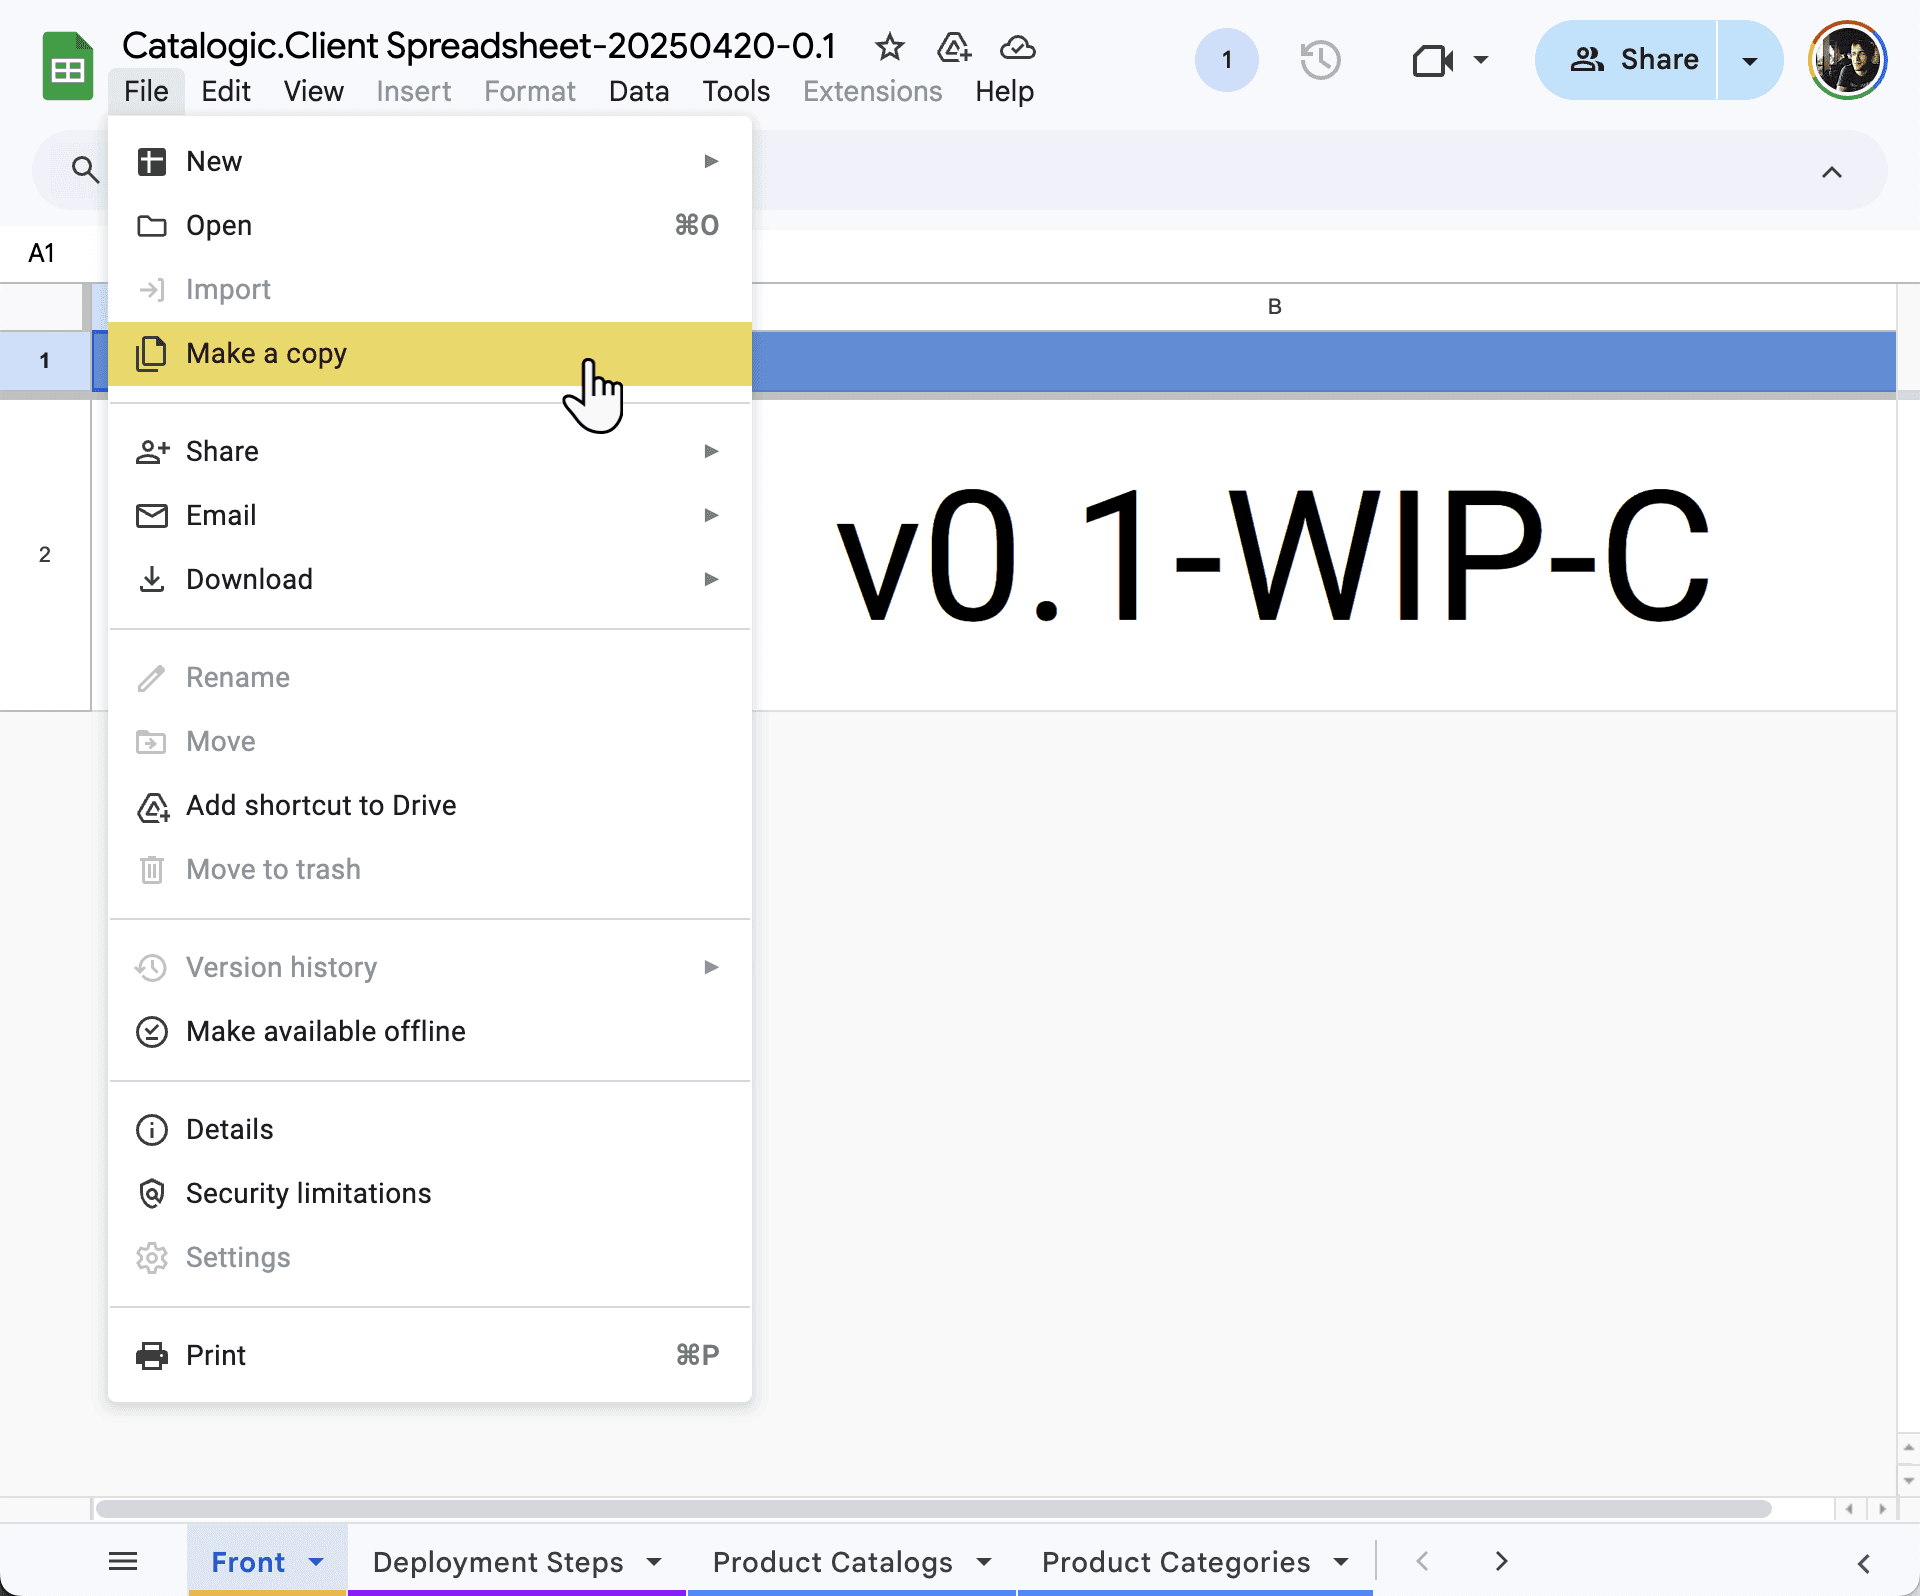
3. Name and save your spreadsheet
Specify a name and choose the destination folder in your Google Drive. This copy will belong to your account. We will not have access to it, unless you share it with us.
4. Check Catalogic 🚀 menu item in your client spreadsheet
Once copied, your spreadsheet will include the linked Apps Script project needed to run Catalogic. If everything works as expected, you will see the Catalogic 🚀 menu item. You will apply a small configuration change to the script later in the installation process.
Connecting Your Catalogic Spreadsheet and Salesforce
To enable secure communication between the Catalogic spreadsheet (powered by Google Apps Script) and your Salesforce organization, a Connected App is required. This app handles OAuth 2.0 authorization for pushing and pulling data between the systems. We will use the app you created earlier in the process.
To begin, you need to retrieve your Salesforce connected app credentials.
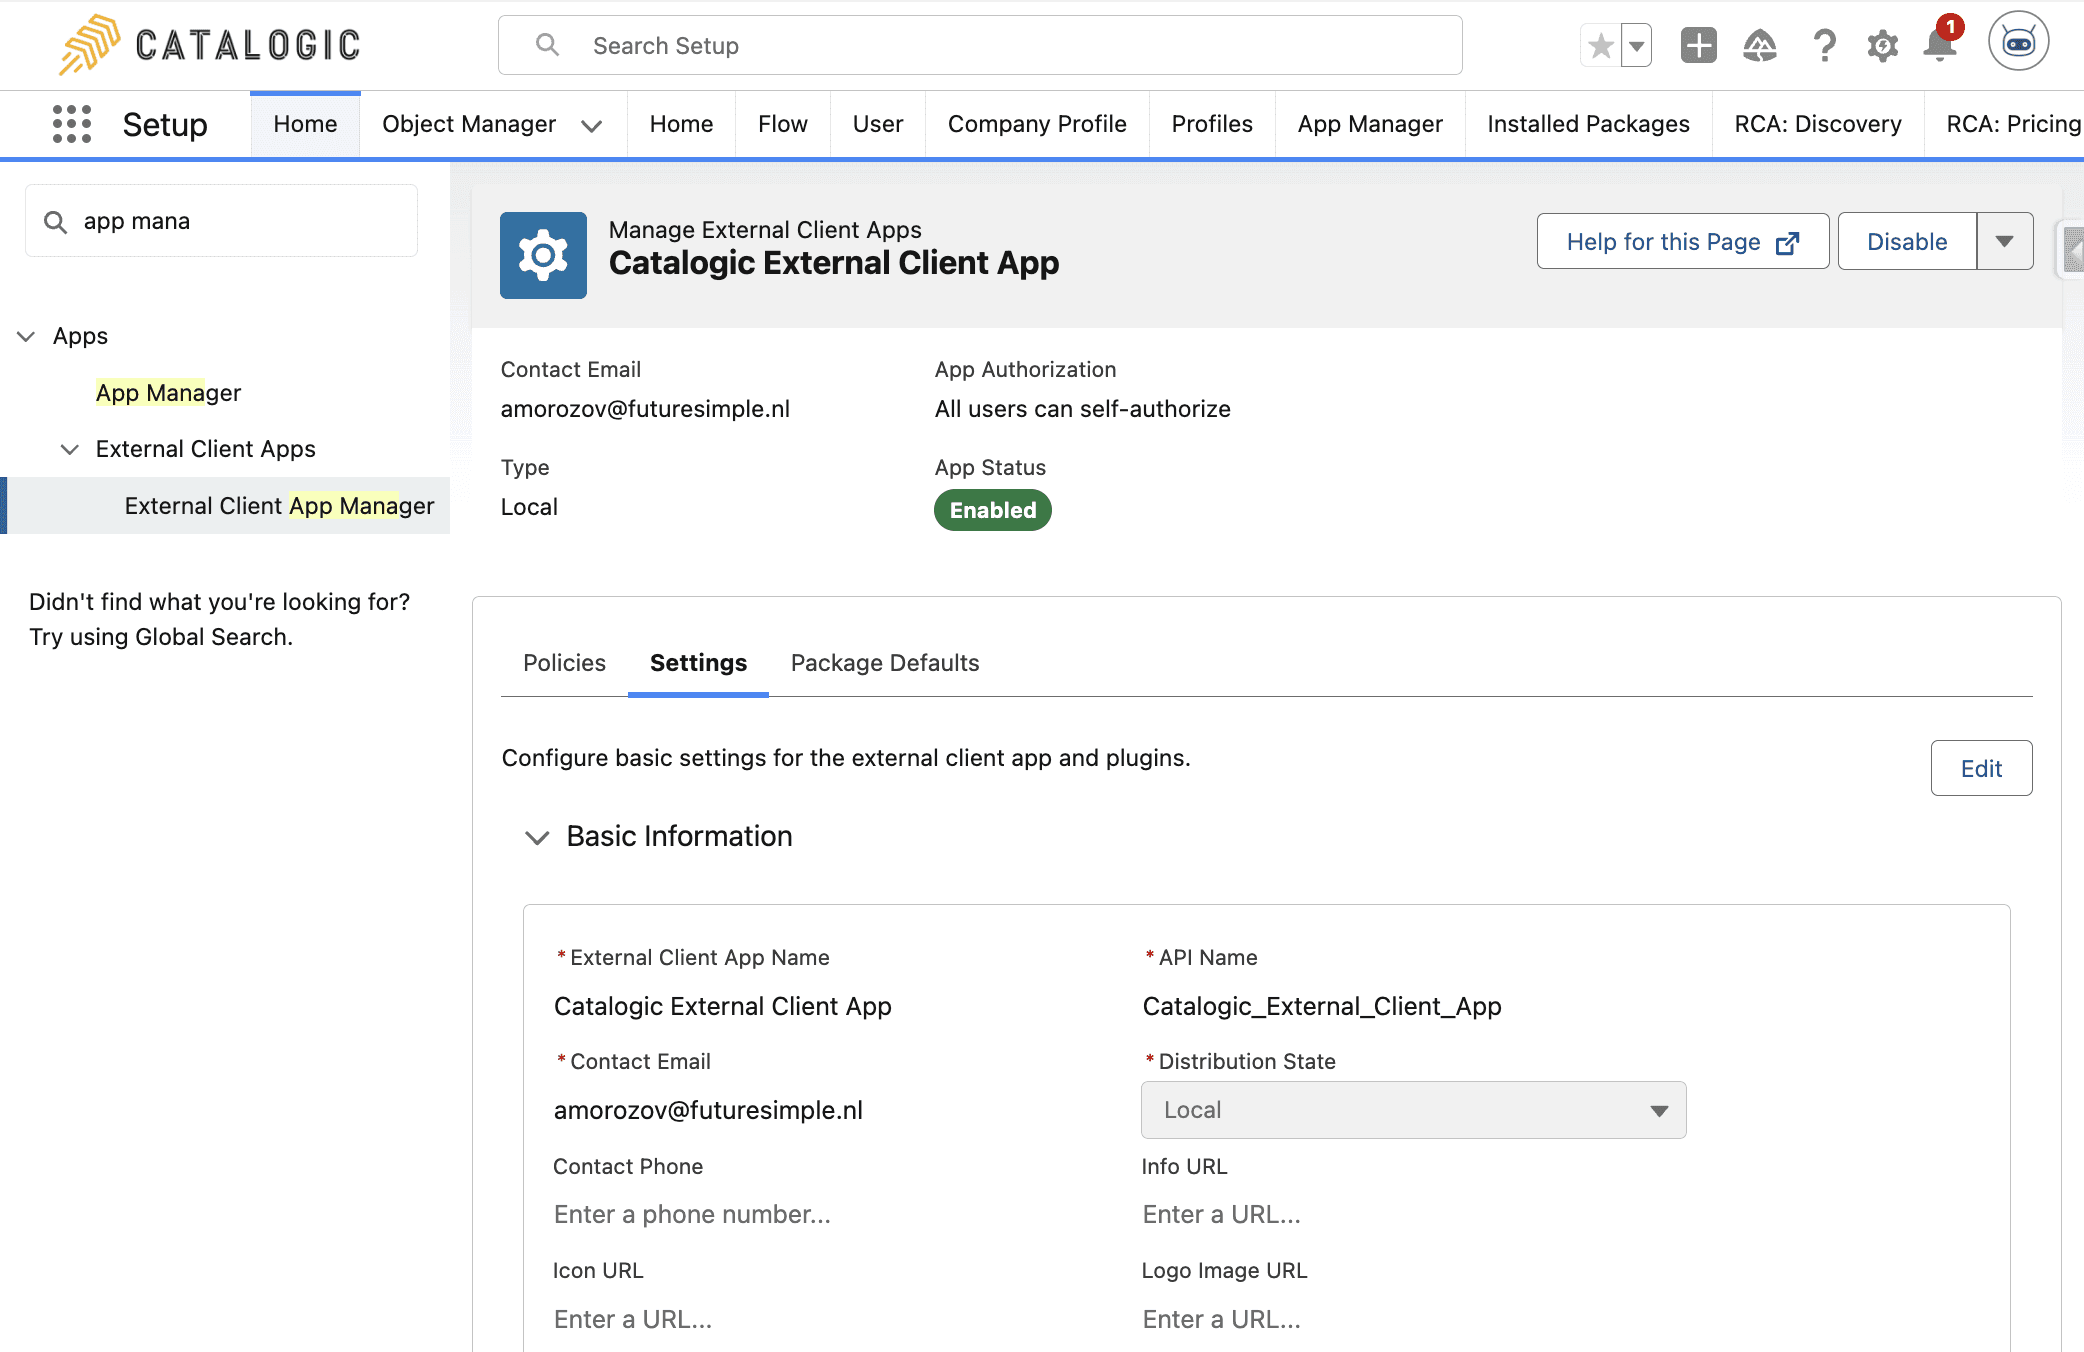
Step 1: Open the External Client App in Salesforce
In your Salesforce org, go to Setup
Navigate to Apps > External Client Apps > External Client App Manager
Locate the app named Catalogic Connected App and open it
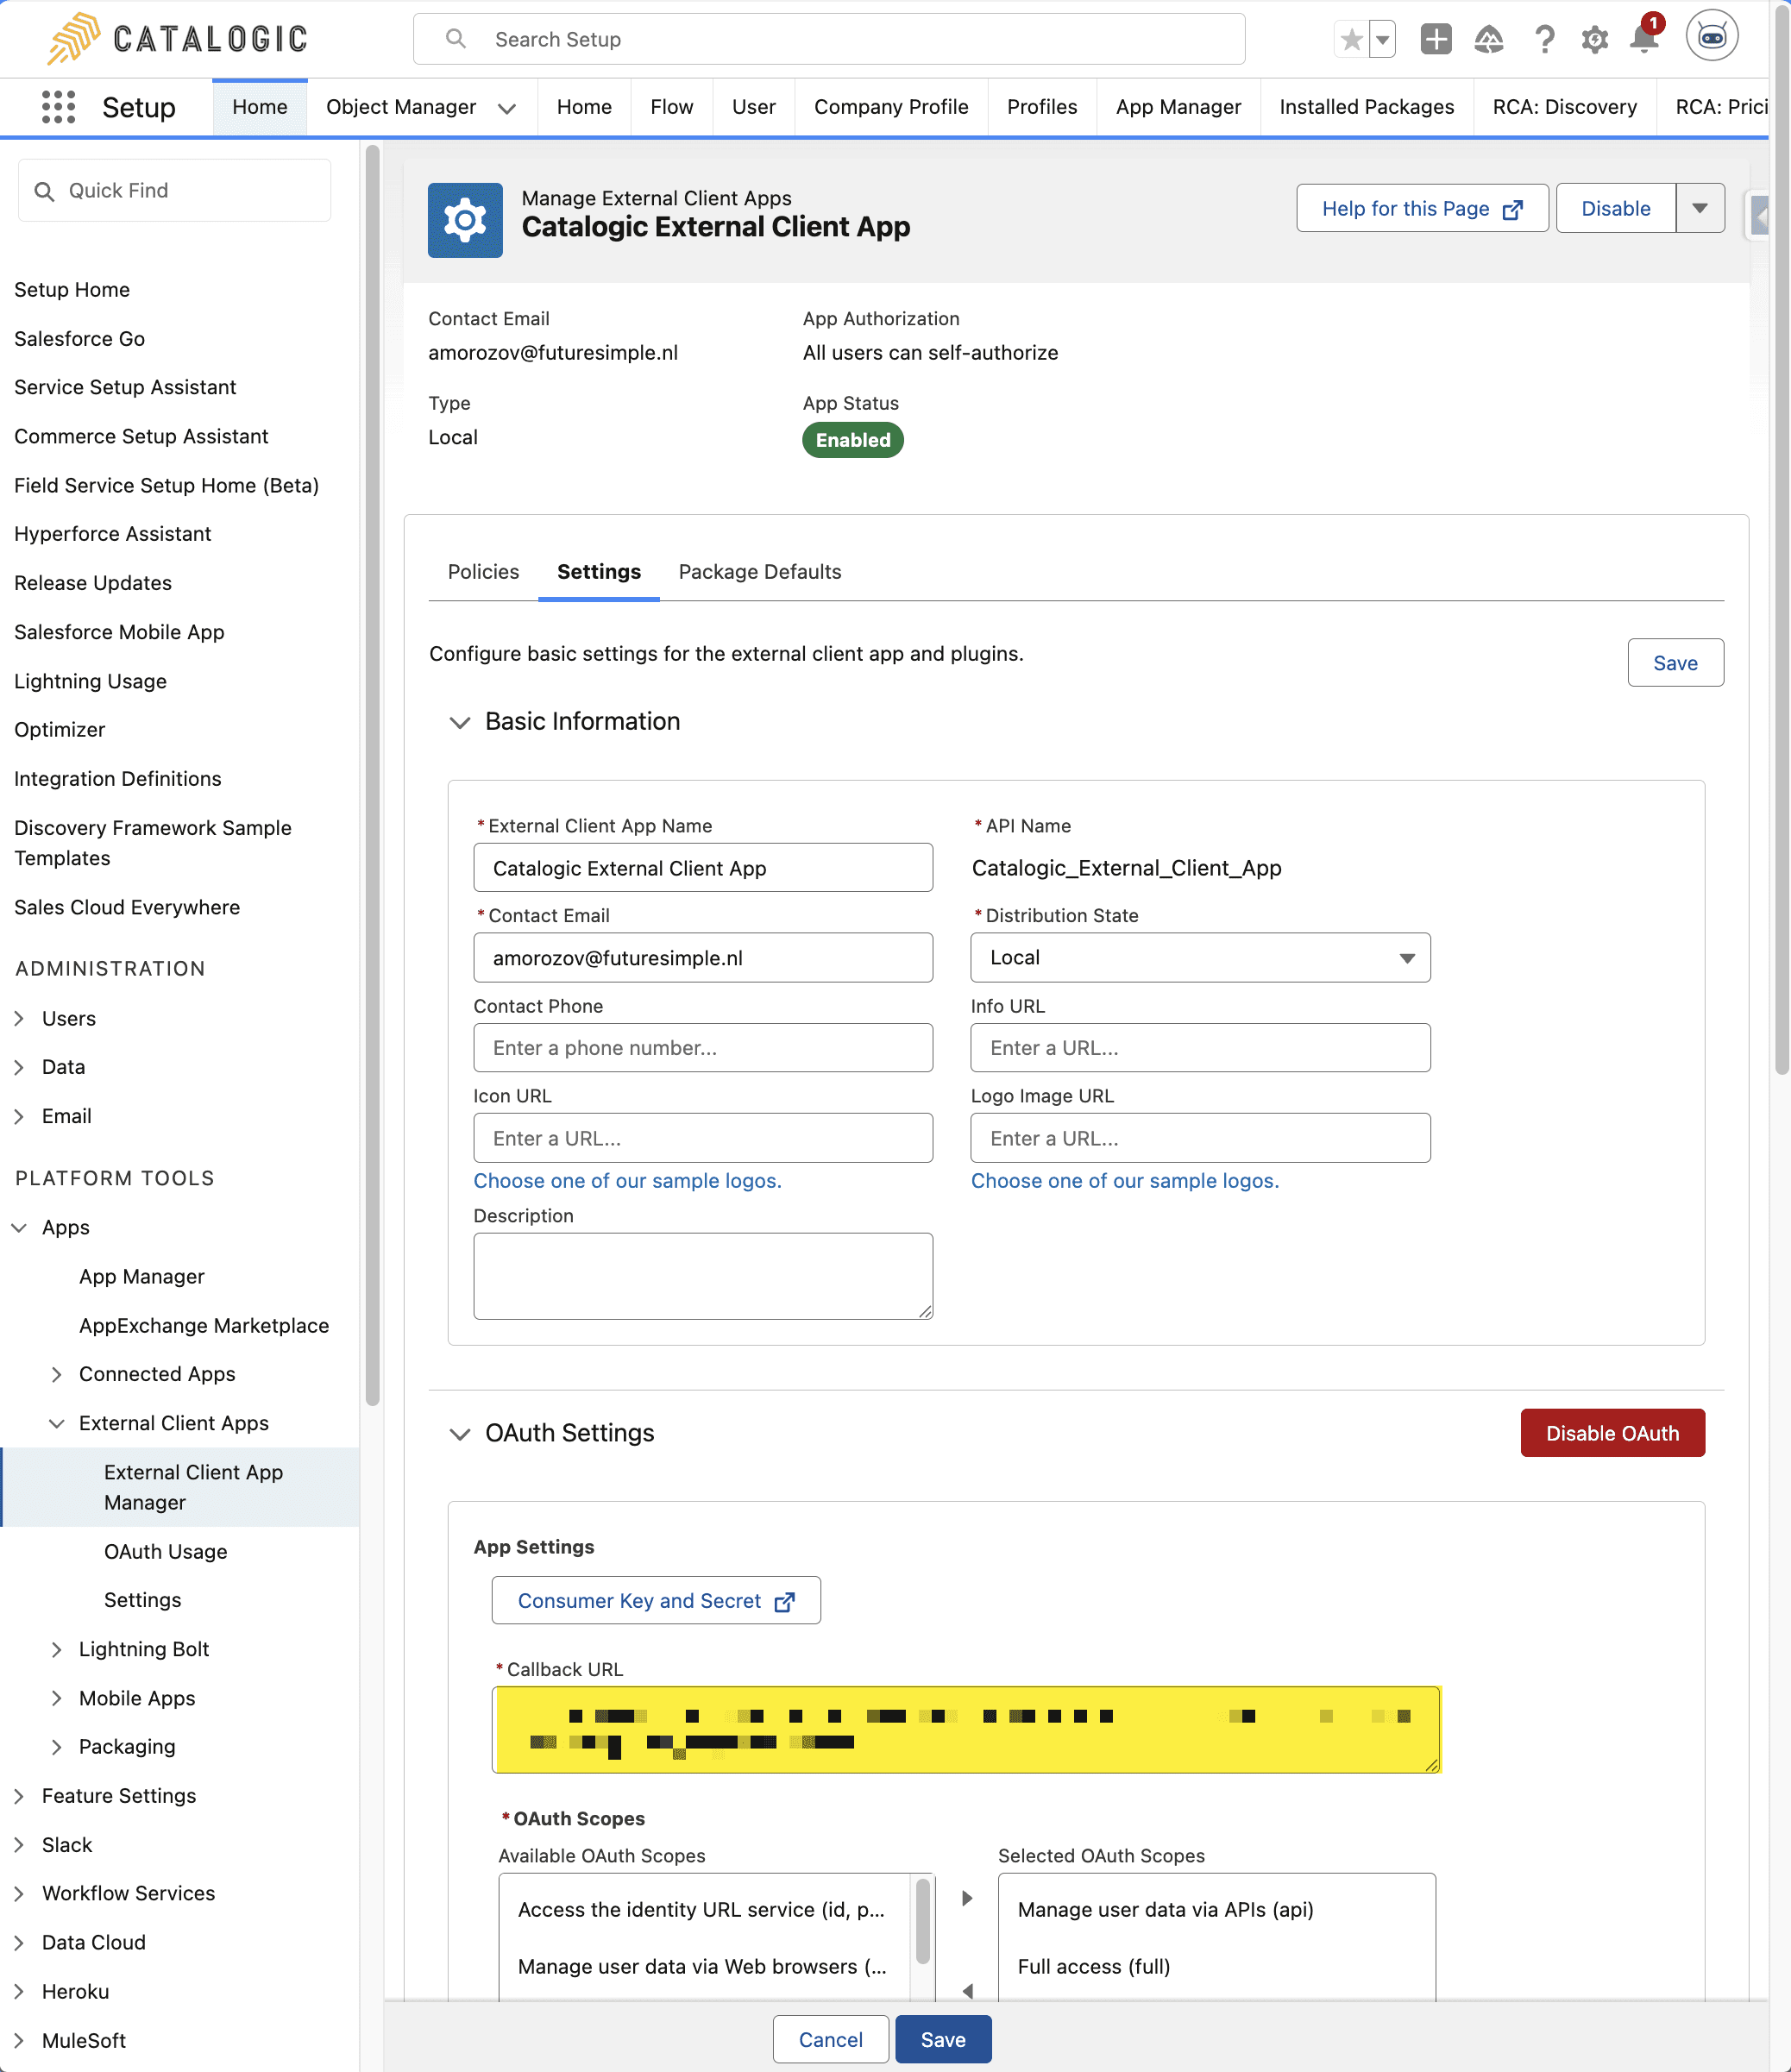
Navigate to the Settings tab within the Catalogic Connected App
Step 2: Copy the Connected App Credentials
Once on the connected app Settings tab:
Expand the OAuth Settings section
Click the Consumer Key and Secret button
If prompted, provide the verification code that will be sent to the org administrator
Copy the Consumer Key and Consumer Secret values into a text editor.
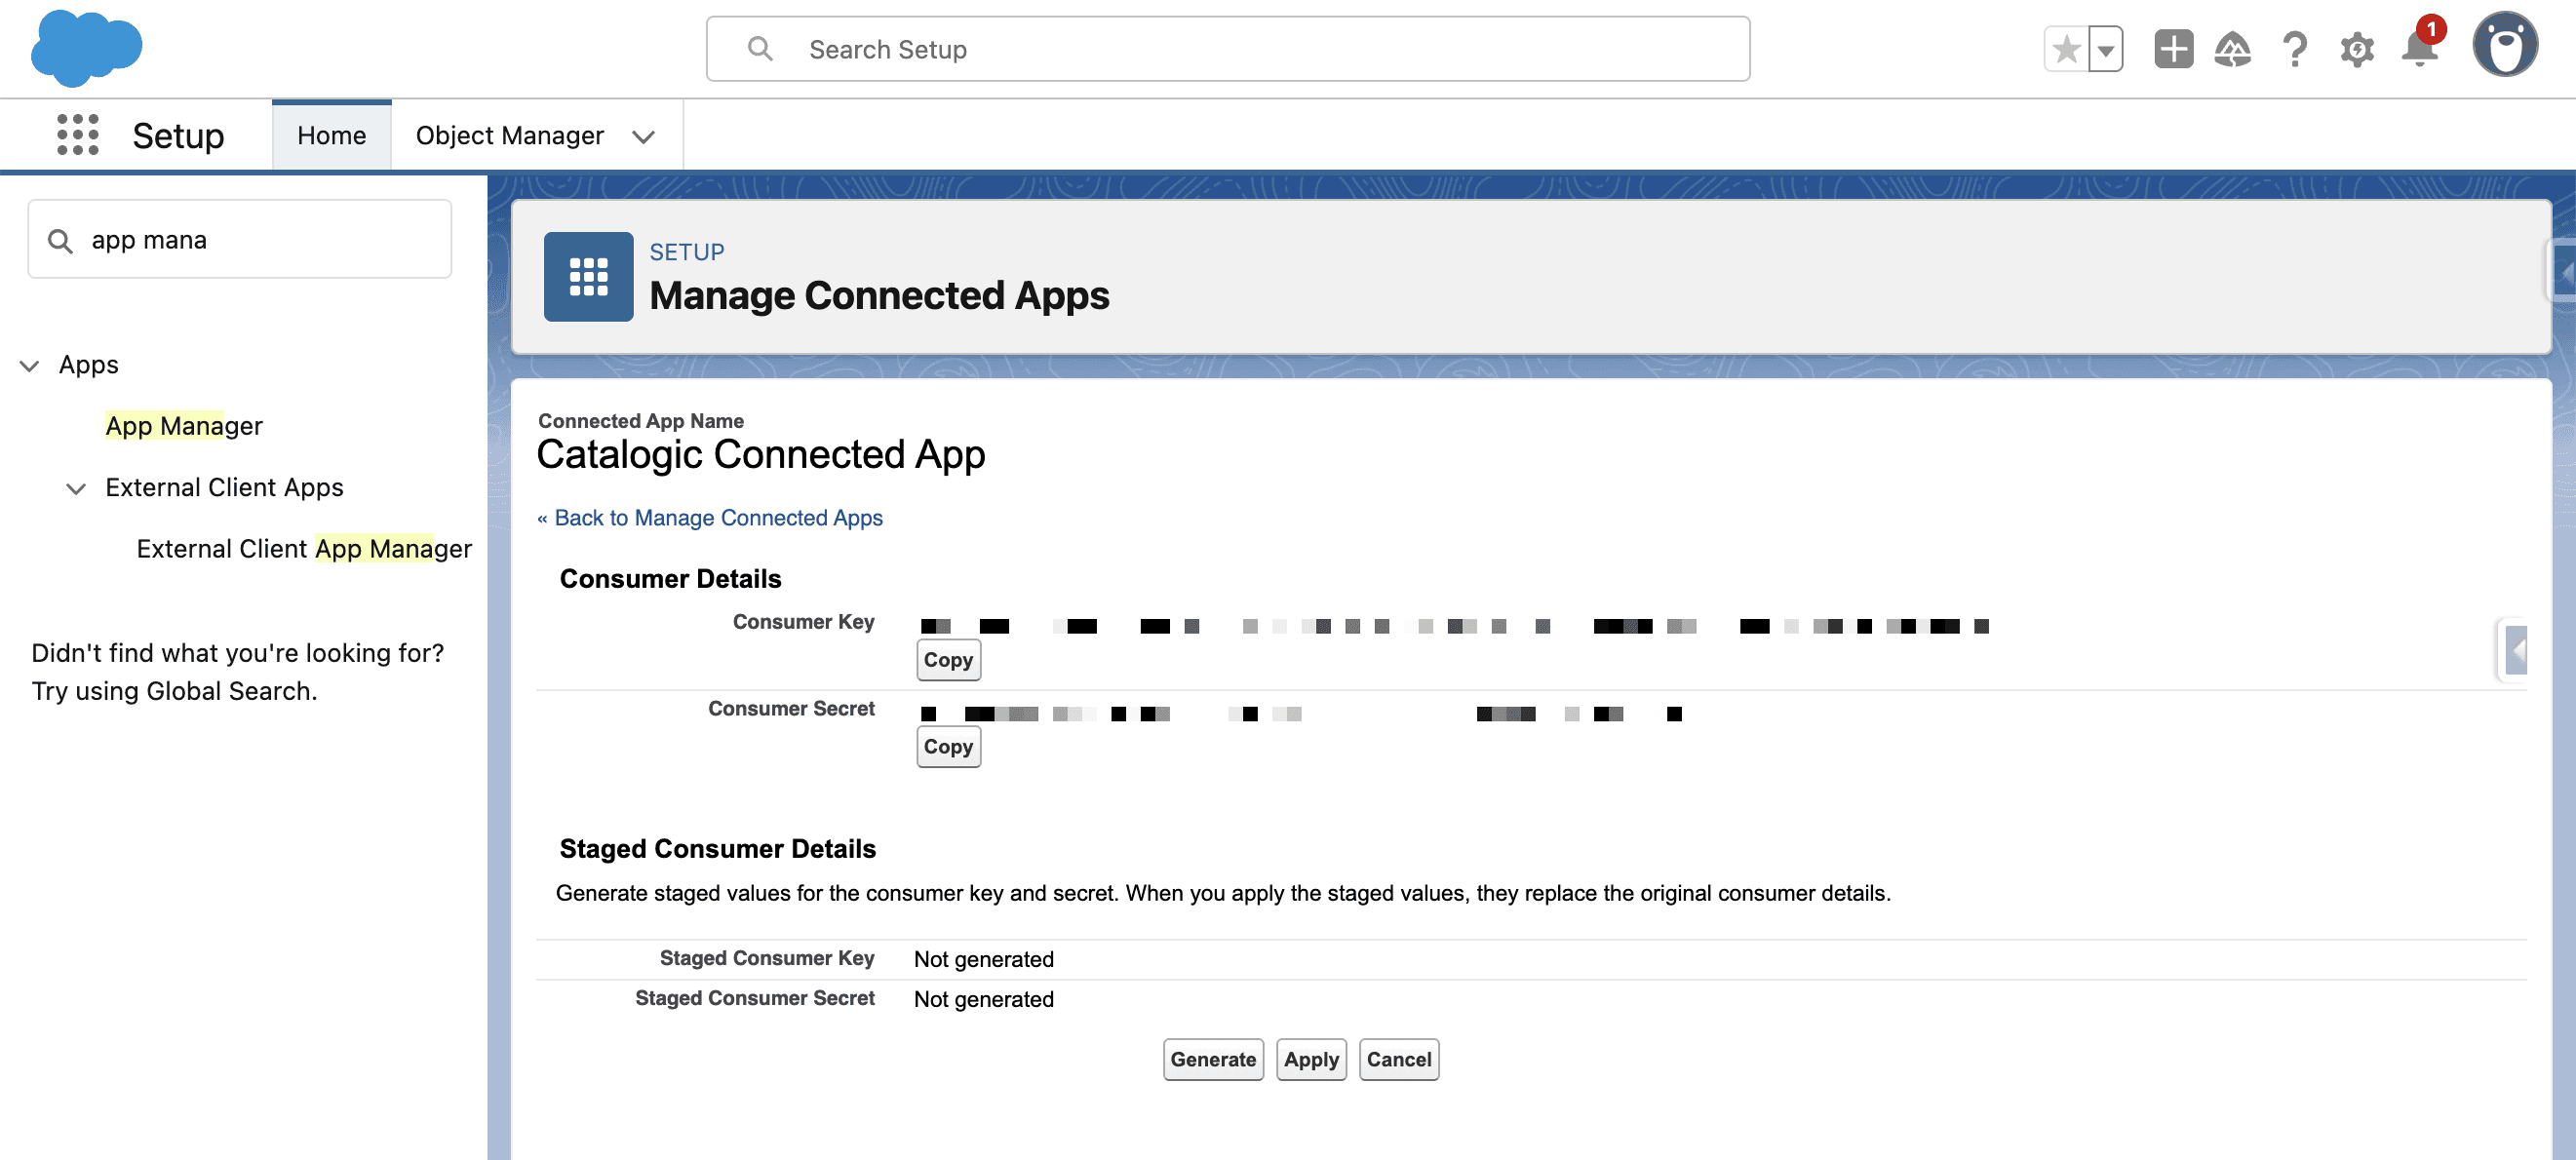
These credentials will be needed later when authorizing the spreadsheet to connect to Salesforce. Do not close the tab yet — you’ll return to it shortly when completing the authorization process in the spreadsheet.
Step 3: Configure OAuth Settings in the Spreadsheet
Now that you have the Consumer Key and Consumer Secret from your Salesforce connected app, the next step is to configure your Catalogic spreadsheet to connect to the target Salesforce organization.
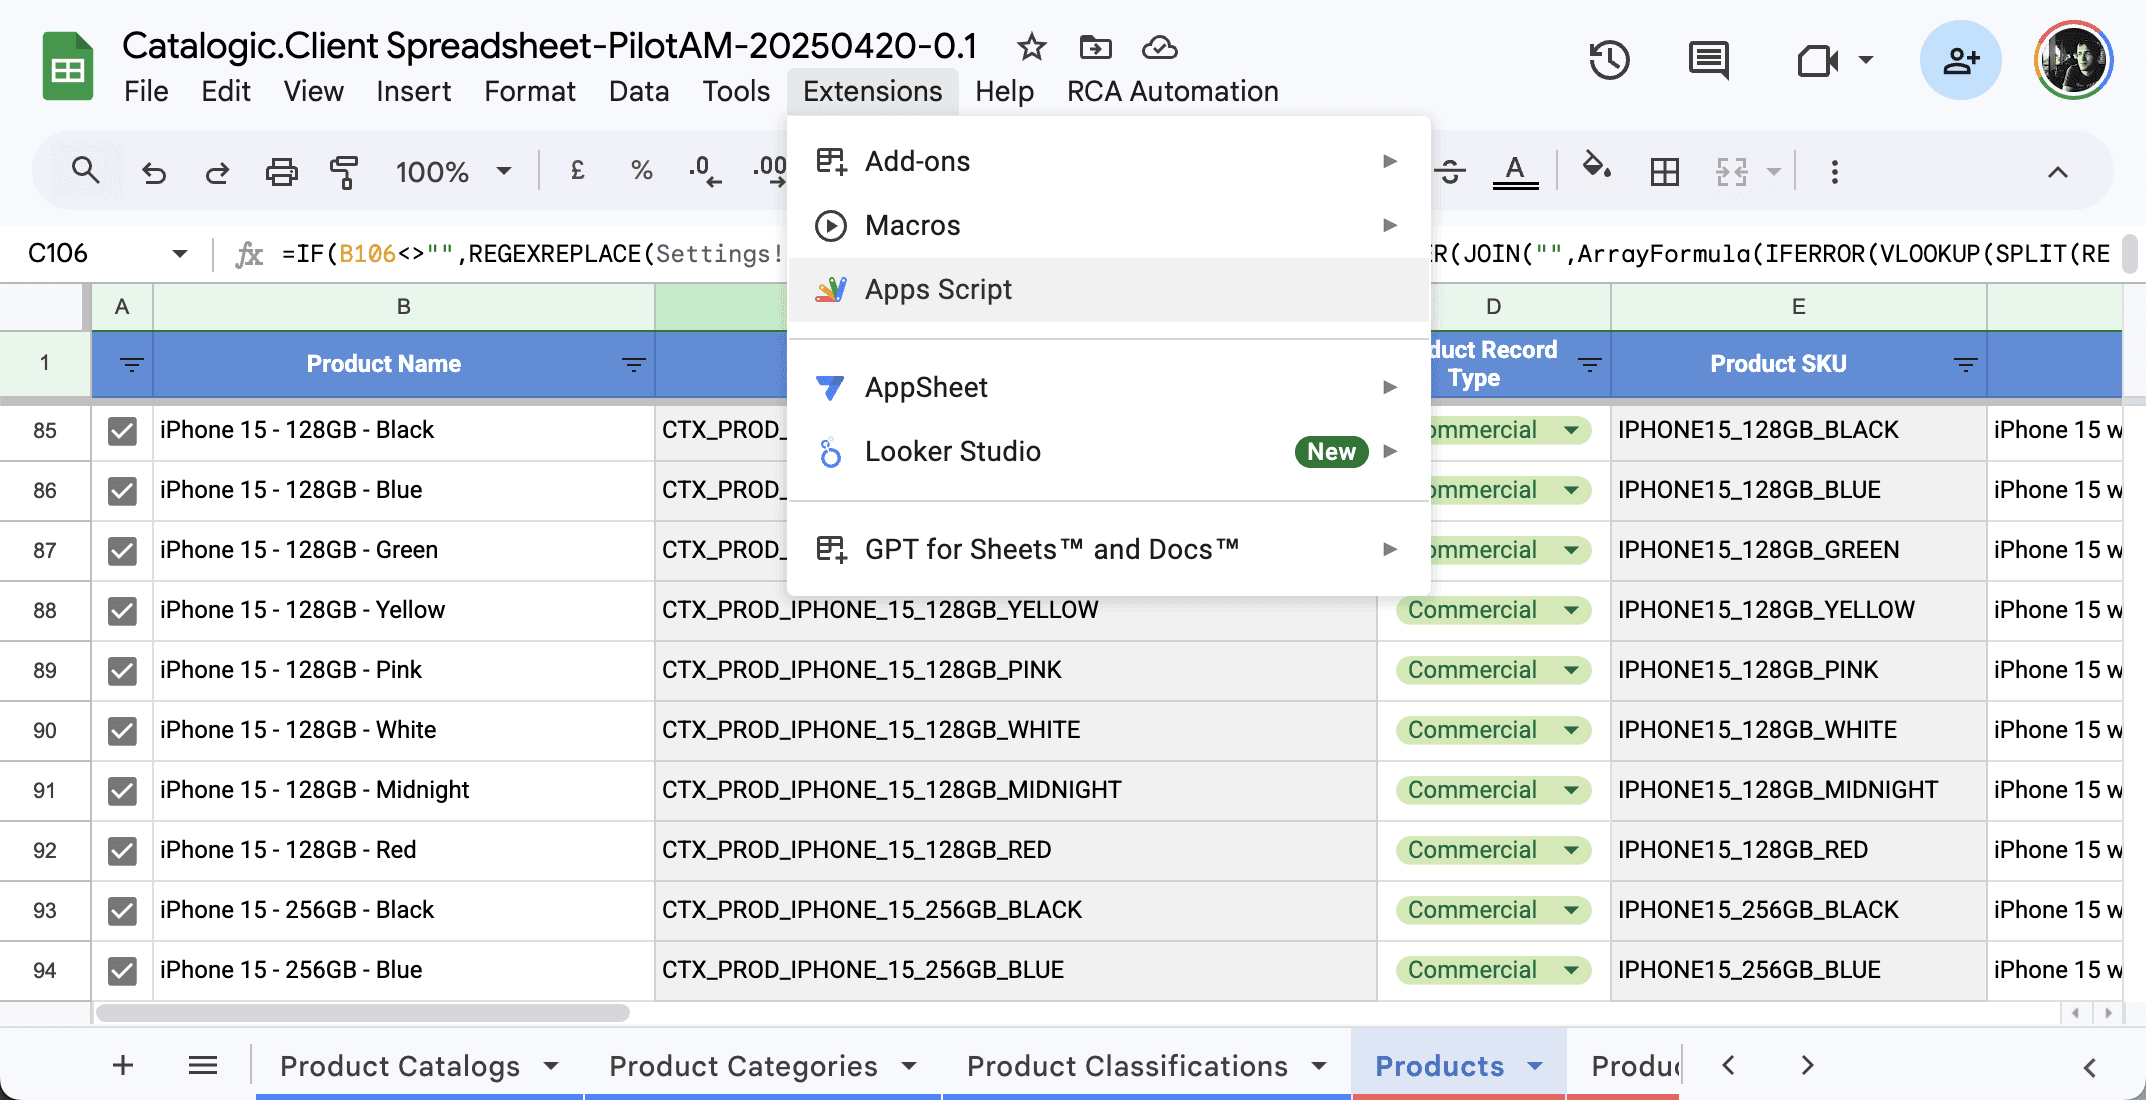
1. Open the Script Editor
In the menu bar of your Catalogic spreadsheet, select: Extensions > Apps Script
2. Open Test Deployments
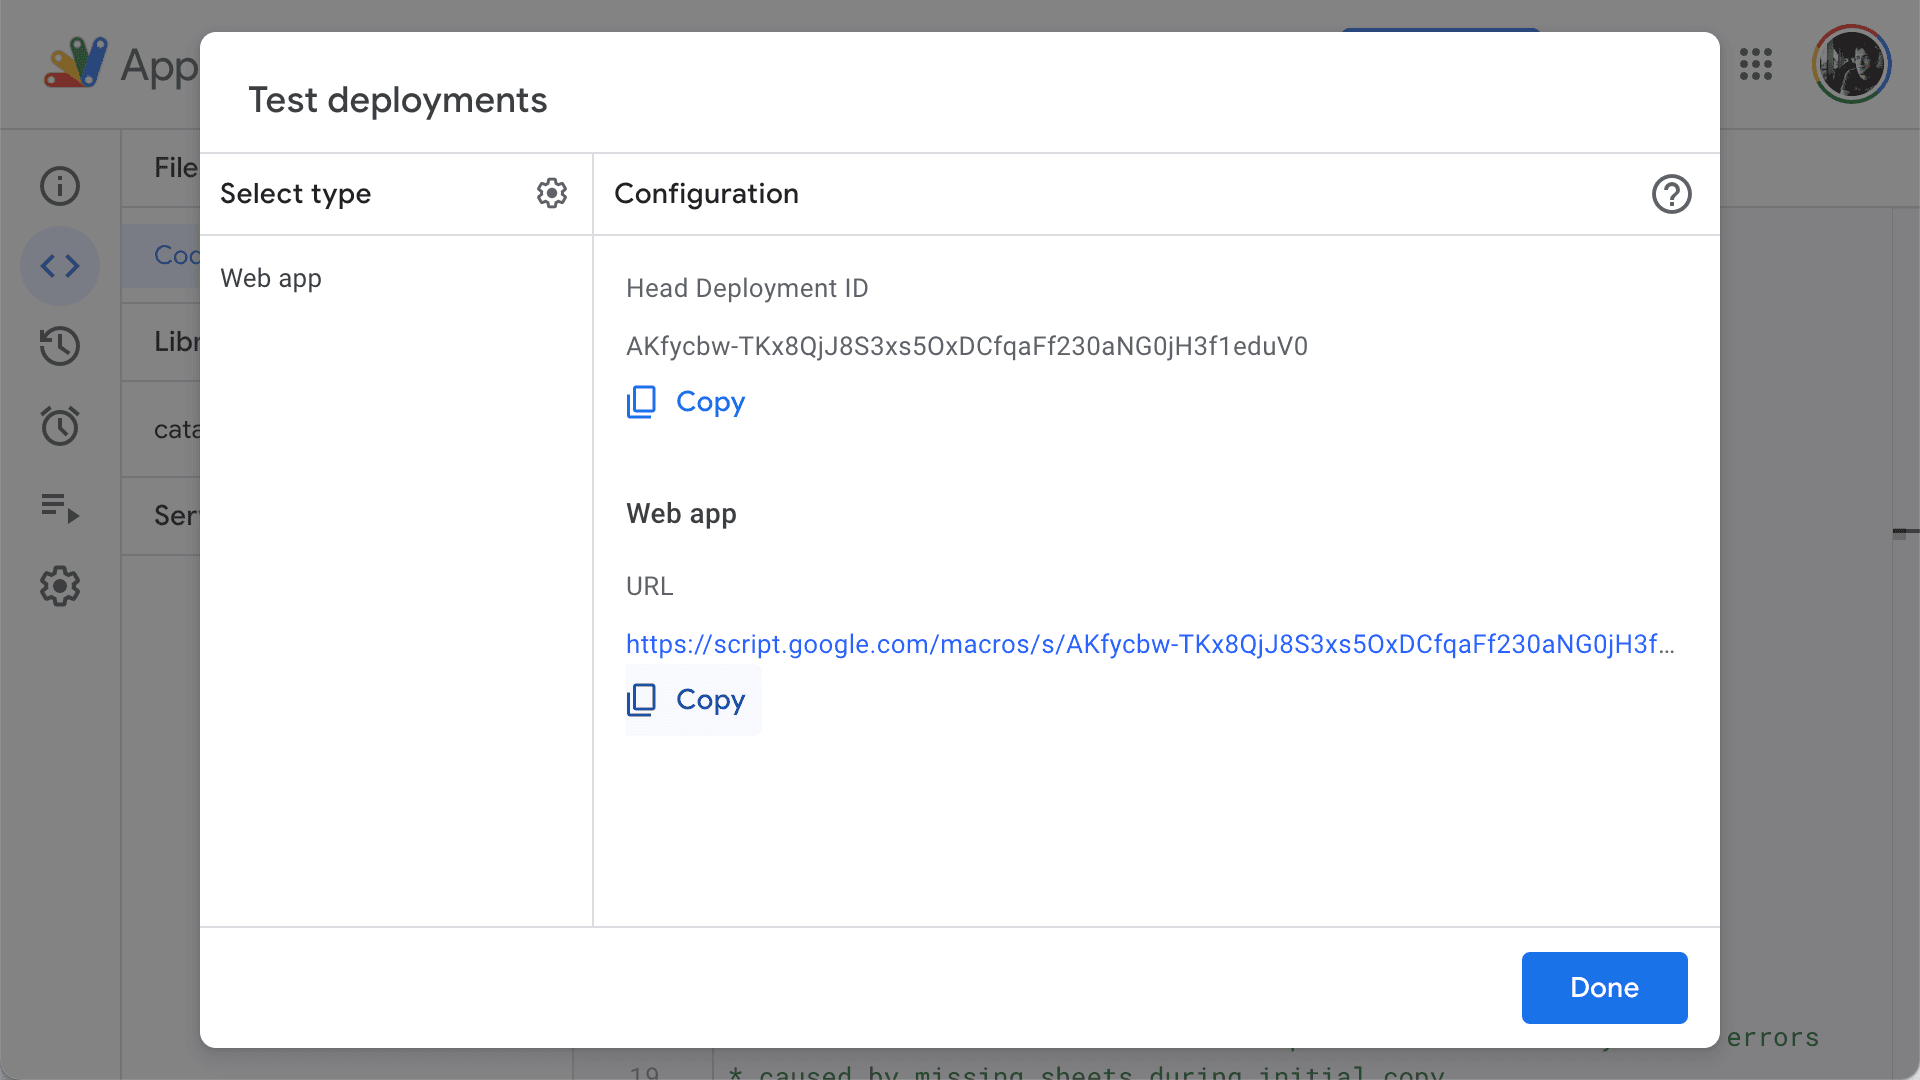
In the script editor, go to: Deploy > Test deployments
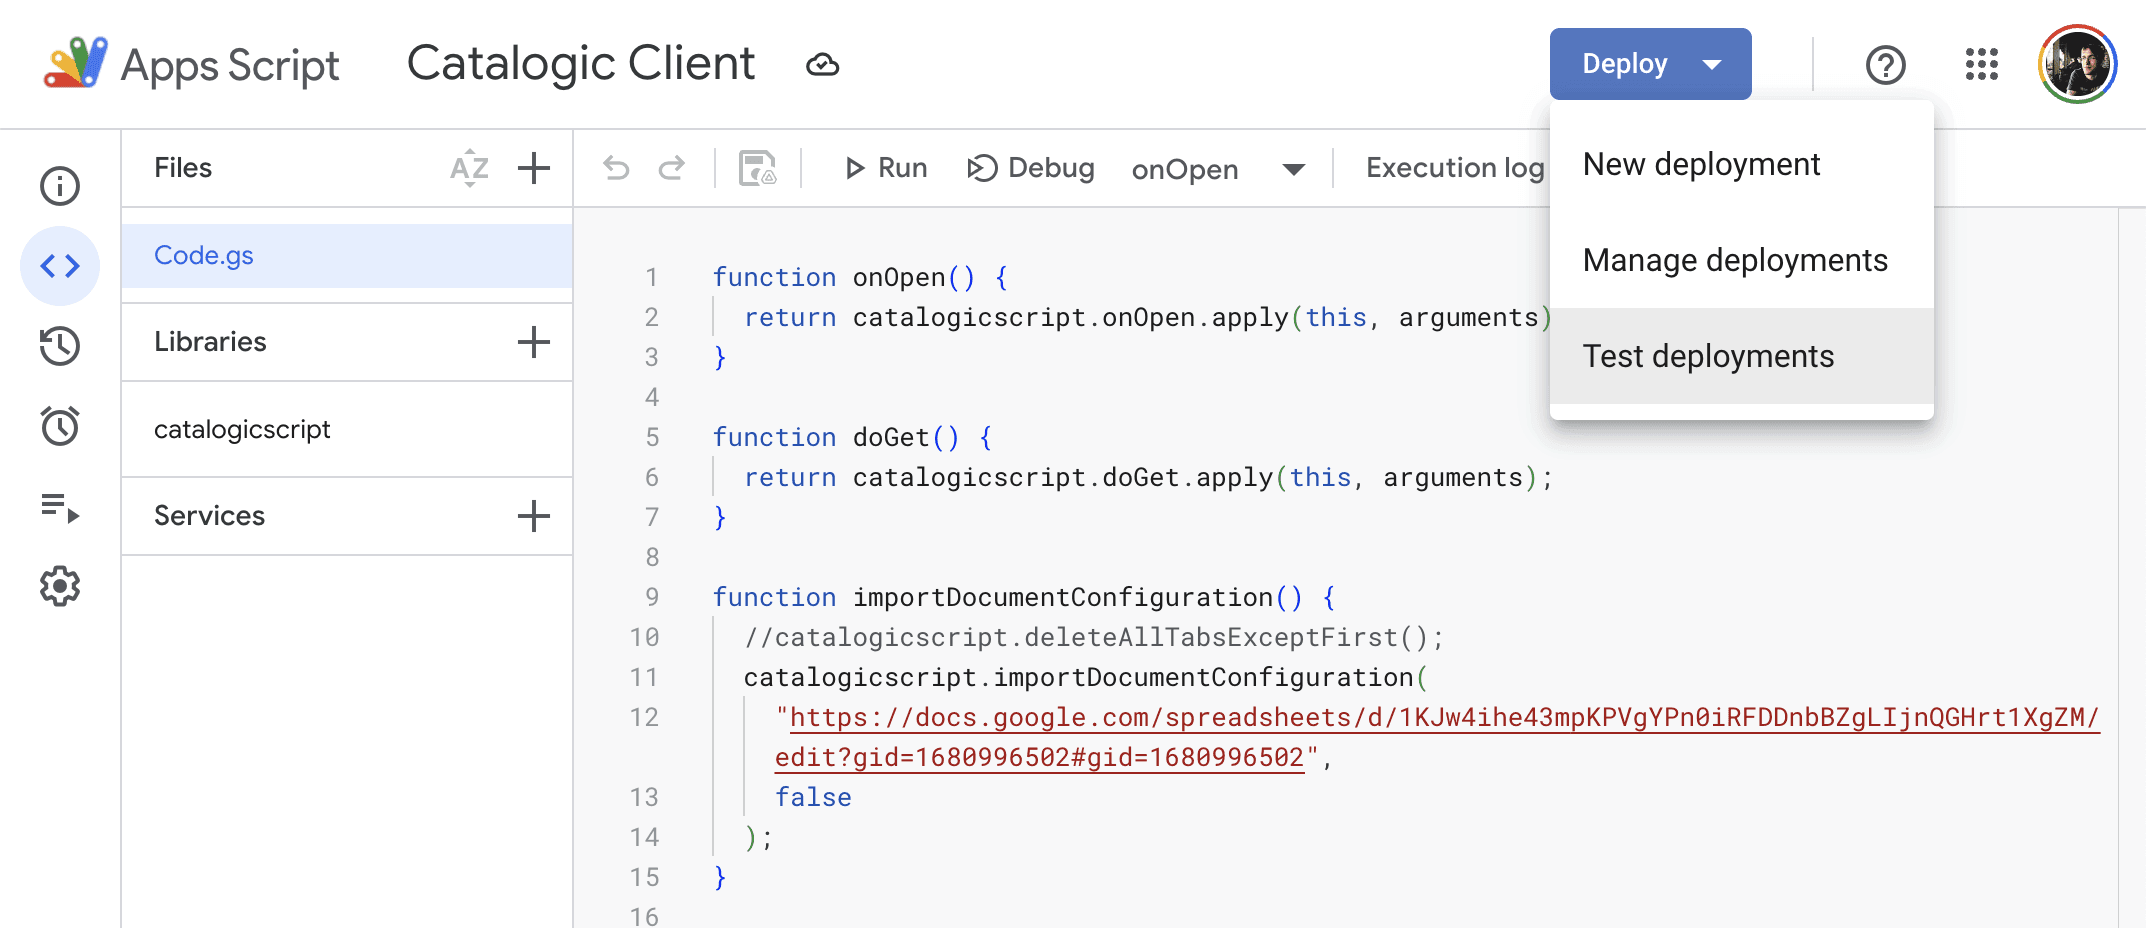
Copy the URL of the test deployment and paste it into a text editor. You will use this URL in a moment
You can now close the script editor.
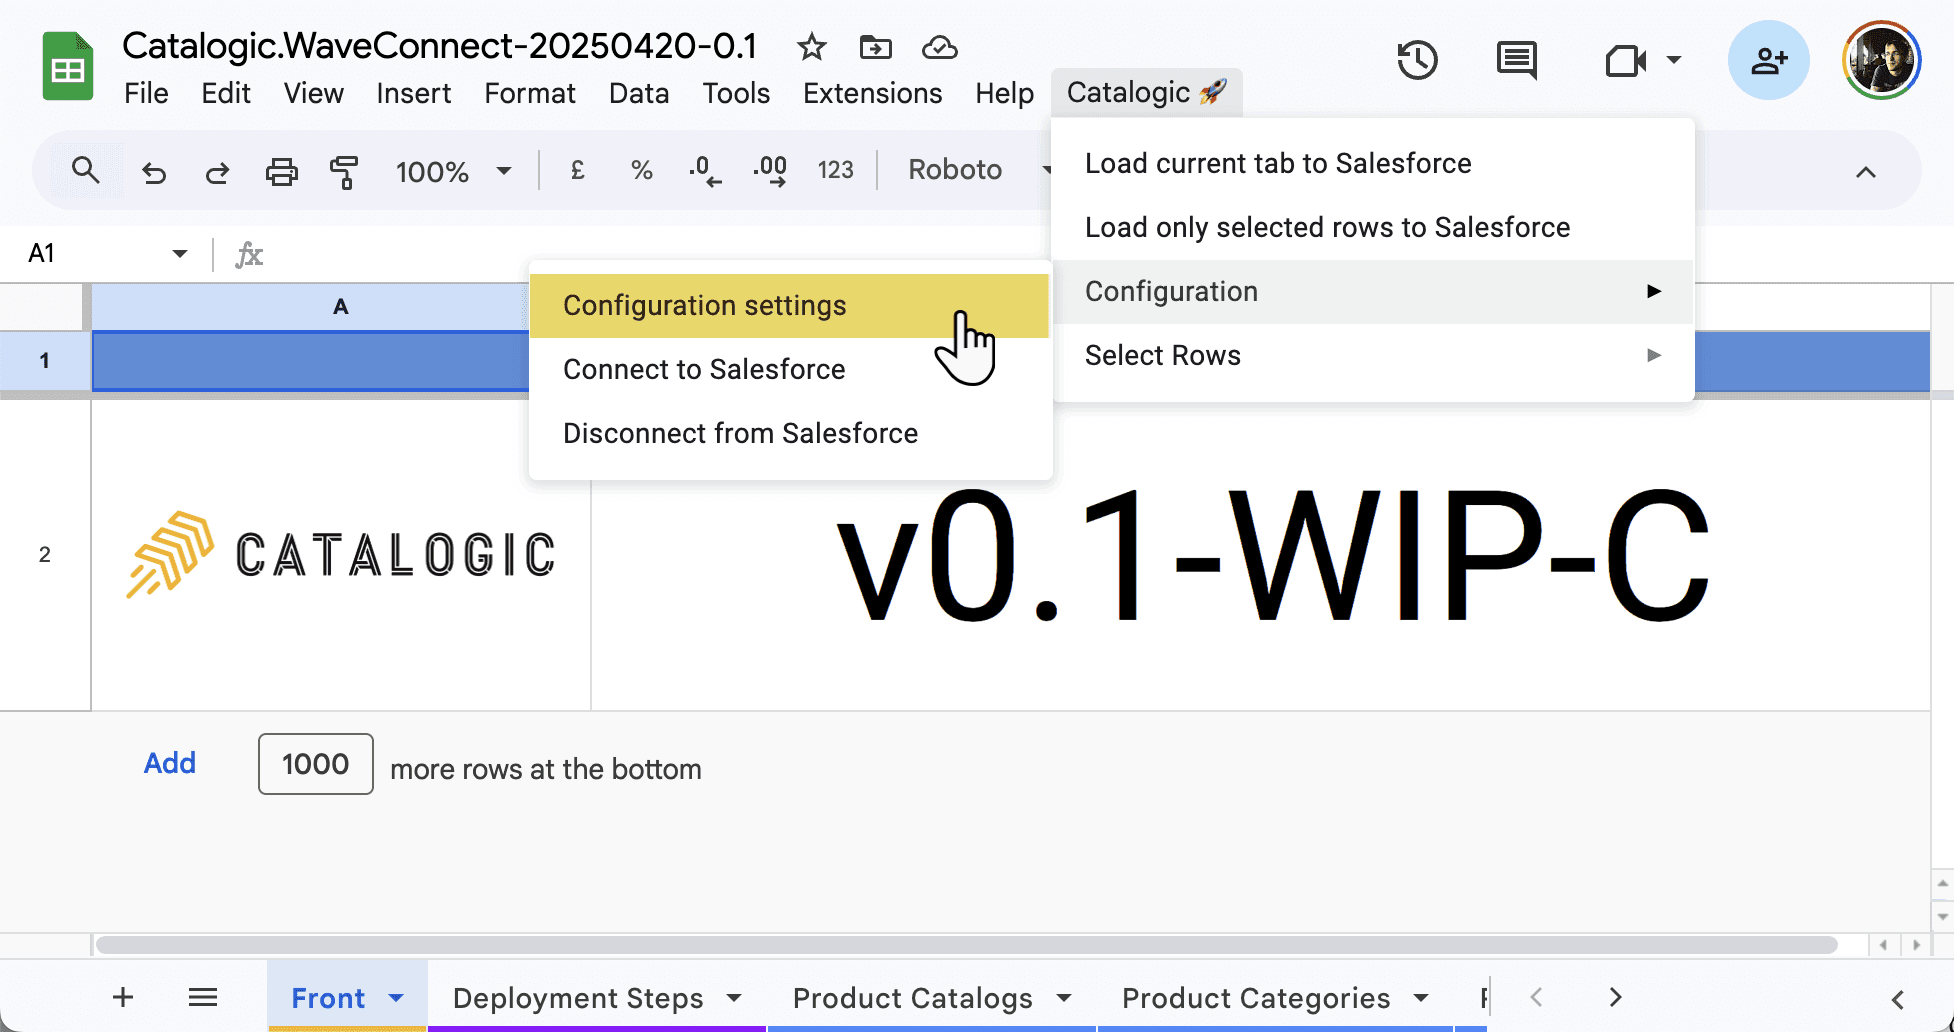
3. Start the OAuth Configuration Flow
Return to the spreadsheet.
From the menu bar, choose: Catalogic Automation > Configuration > Configuration Settings
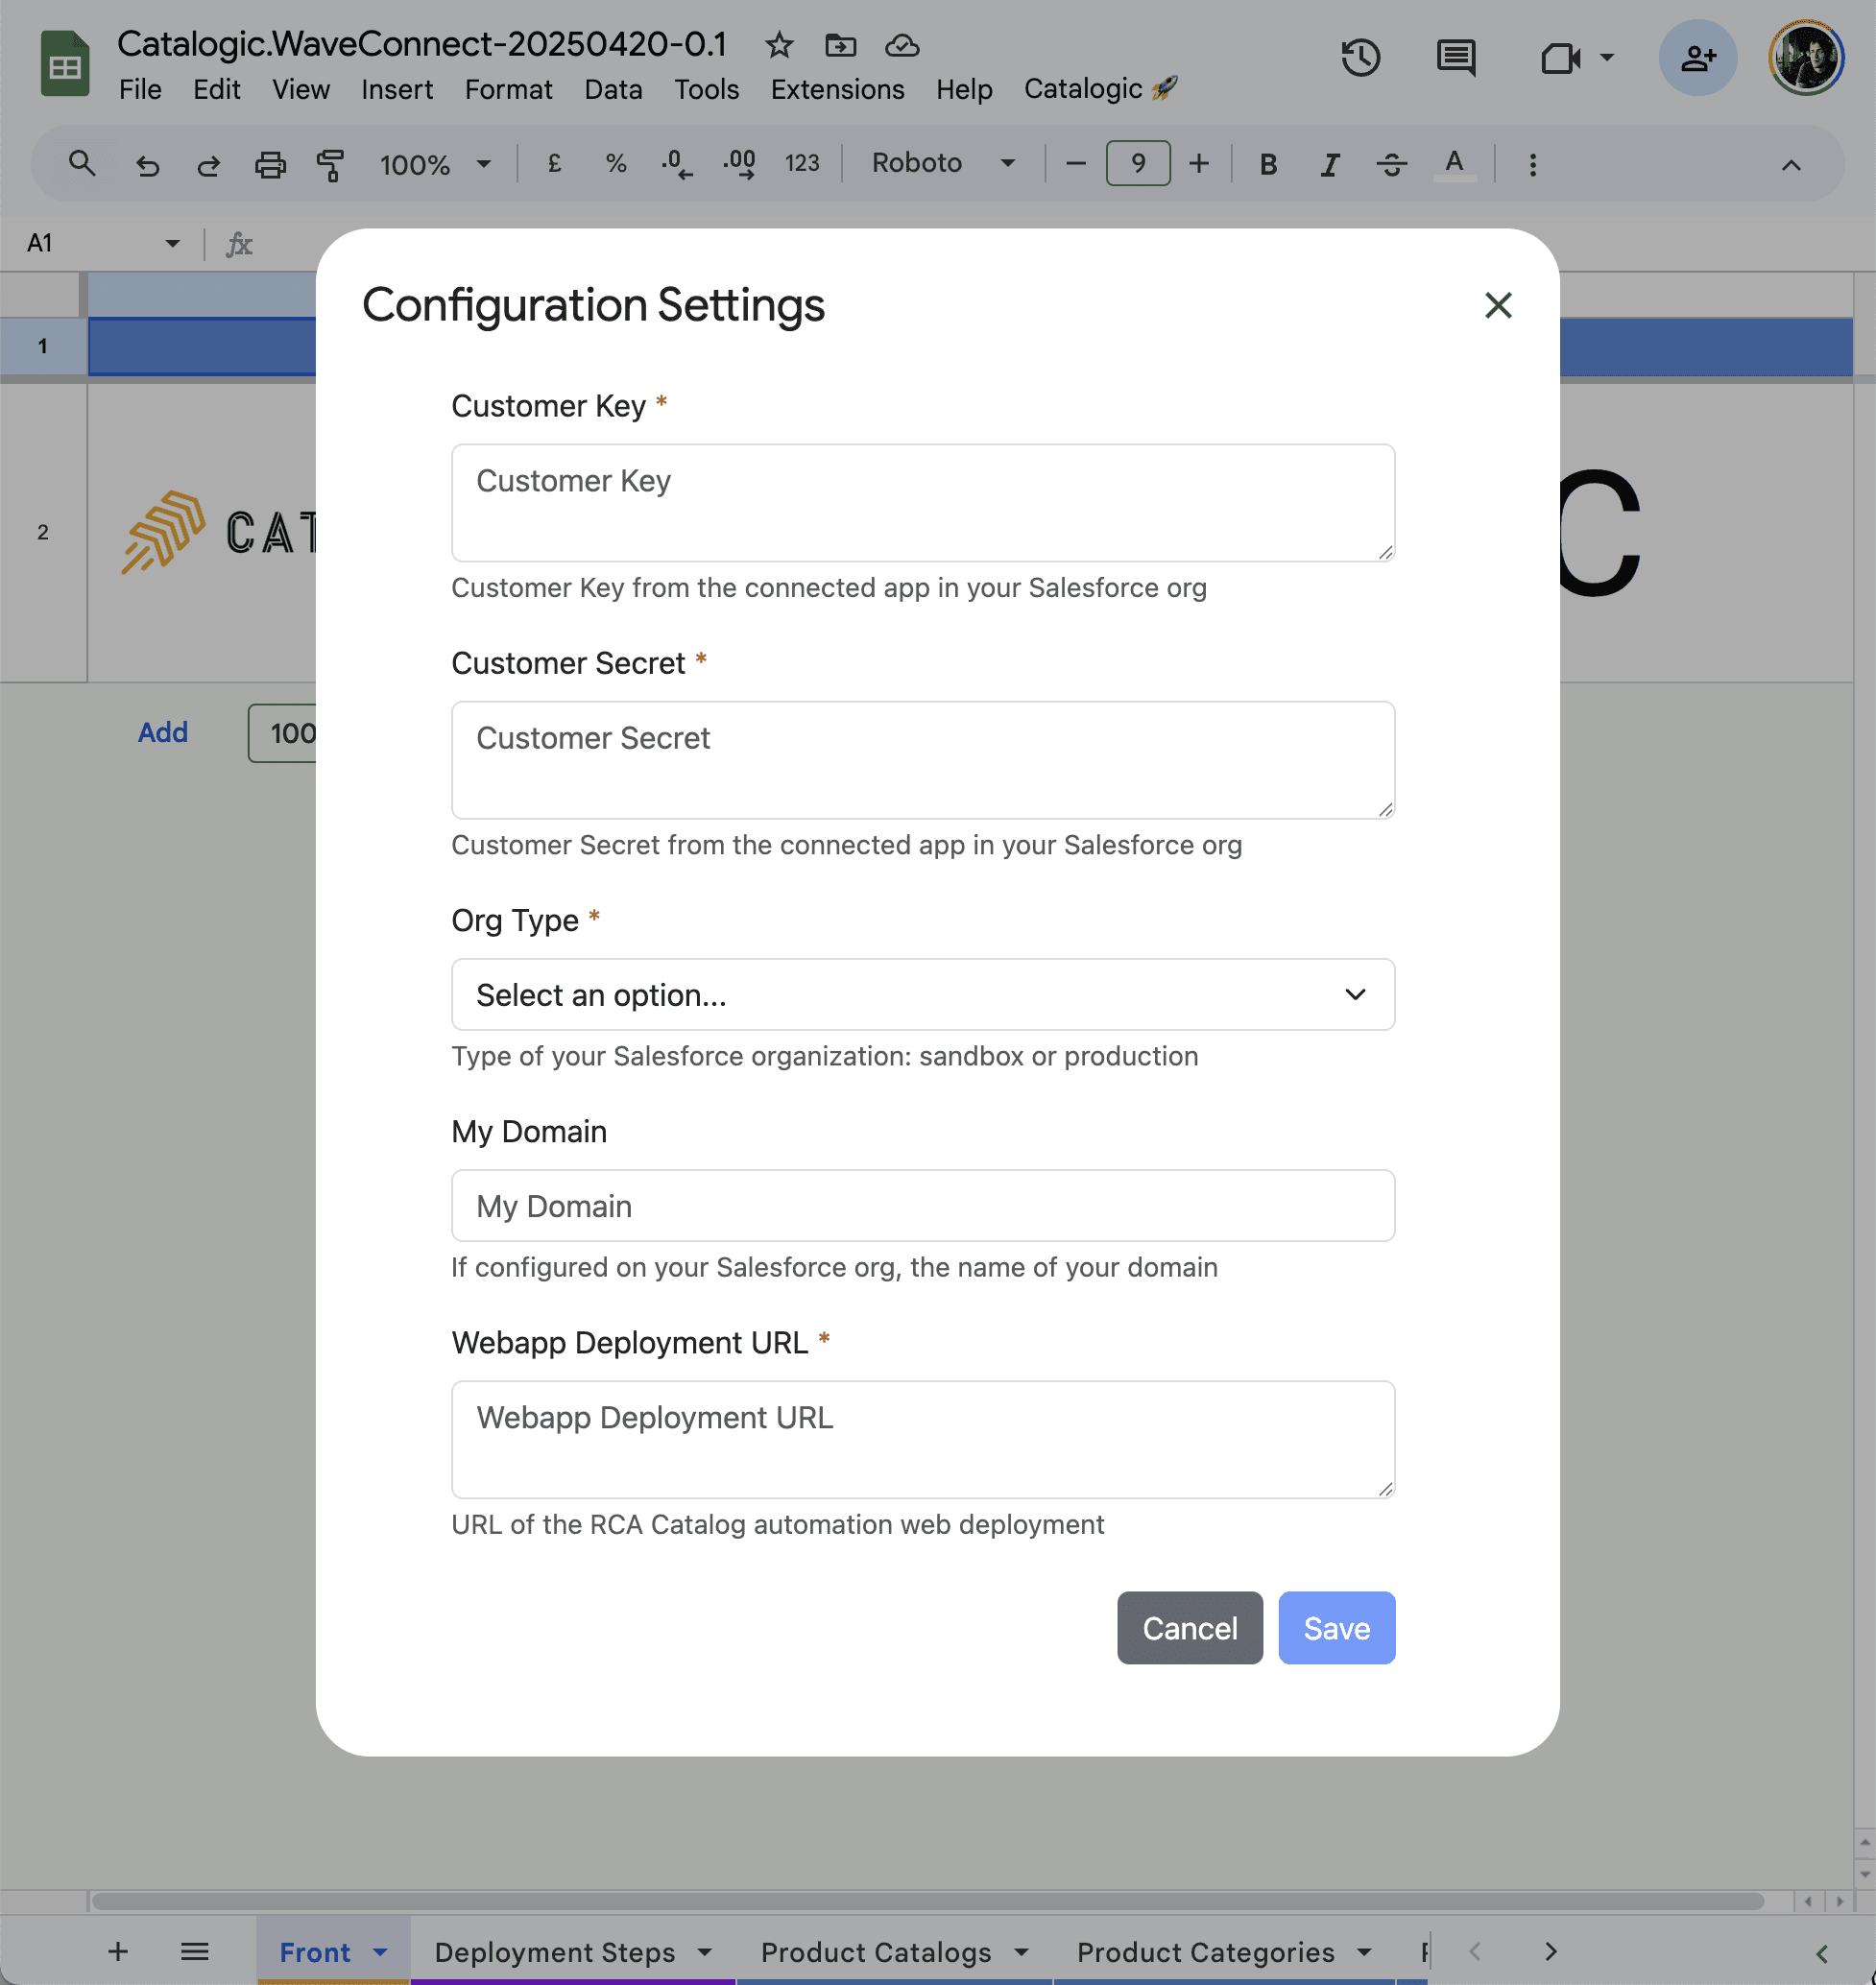
4. Fill Out the Configuration Form
You’ll now be prompted to enter:
Consumer Key (from Salesforce)
Consumer Secret (from Salesforce)
Salesforce org type — choose either Production or Sandbox
My Domain (optional)
URL of the test deployment (copied earlier from the script editor)
5. Create the Callback URL
Simply append “/auth/callback” to the deployment URL you copied before. This is your OAuth callback URL, and it will be used shortly when finalizing the connected app setup in Salesforce.
Example callback URL: https://script.google.com/a/macros/salesforce.com/s/AKfycbzdtP8UEBbrbLWVimq1JC6w1L6KMgXFV5a8hYTLyFXJ/dev/auth/callback
Connected Application Configuration
To enable secure communication between the Catalogic spreadsheet (powered by Google Apps Script) and your Salesforce organization, a Connected App is required. This app handles OAuth 2.0 authorization for pushing and pulling data between the systems.
Step 1: Open the Connected App in Salesforce
In your Salesforce org, go to Setup
Navigate to Apps > External Client Apps > External Client App Manager.
Locate the app named Catalogic Connected App and open it
Navigate to the Settings tab within the Catalogic Connected App
Click the Edit button
Step 2: Set the Callback URL
In the connected app configuration:
Locate the Callback URL field
Paste the Callback URL that you previously crafted
Save the changes
Step 4: Wait for Propagation
Changes to a connected app can take between 2 to 10 minutes to propagate across the platform. This is a good time to take a short break.
Had a cup of tea already? Good. Once the settings are applied, your Catalogic client spreadsheet and Salesforce org are now connected, and the authorization process should work seamlessly.
You’re ready to proceed with the Authorization Test Run.
Authorization Test Run
Now that the connected app has been configured in Salesforce and your spreadsheet is set up, it’s time to test the OAuth 2.0 authorization flow and connect your Catalogic spreadsheet to the Salesforce organization.
Step-by-Step Instructions
Open your Catalogic spreadsheet
From the menu bar, select: Catalogic > Configuration > Connect to Salesforce

In the dialog that appears, click the Connect button
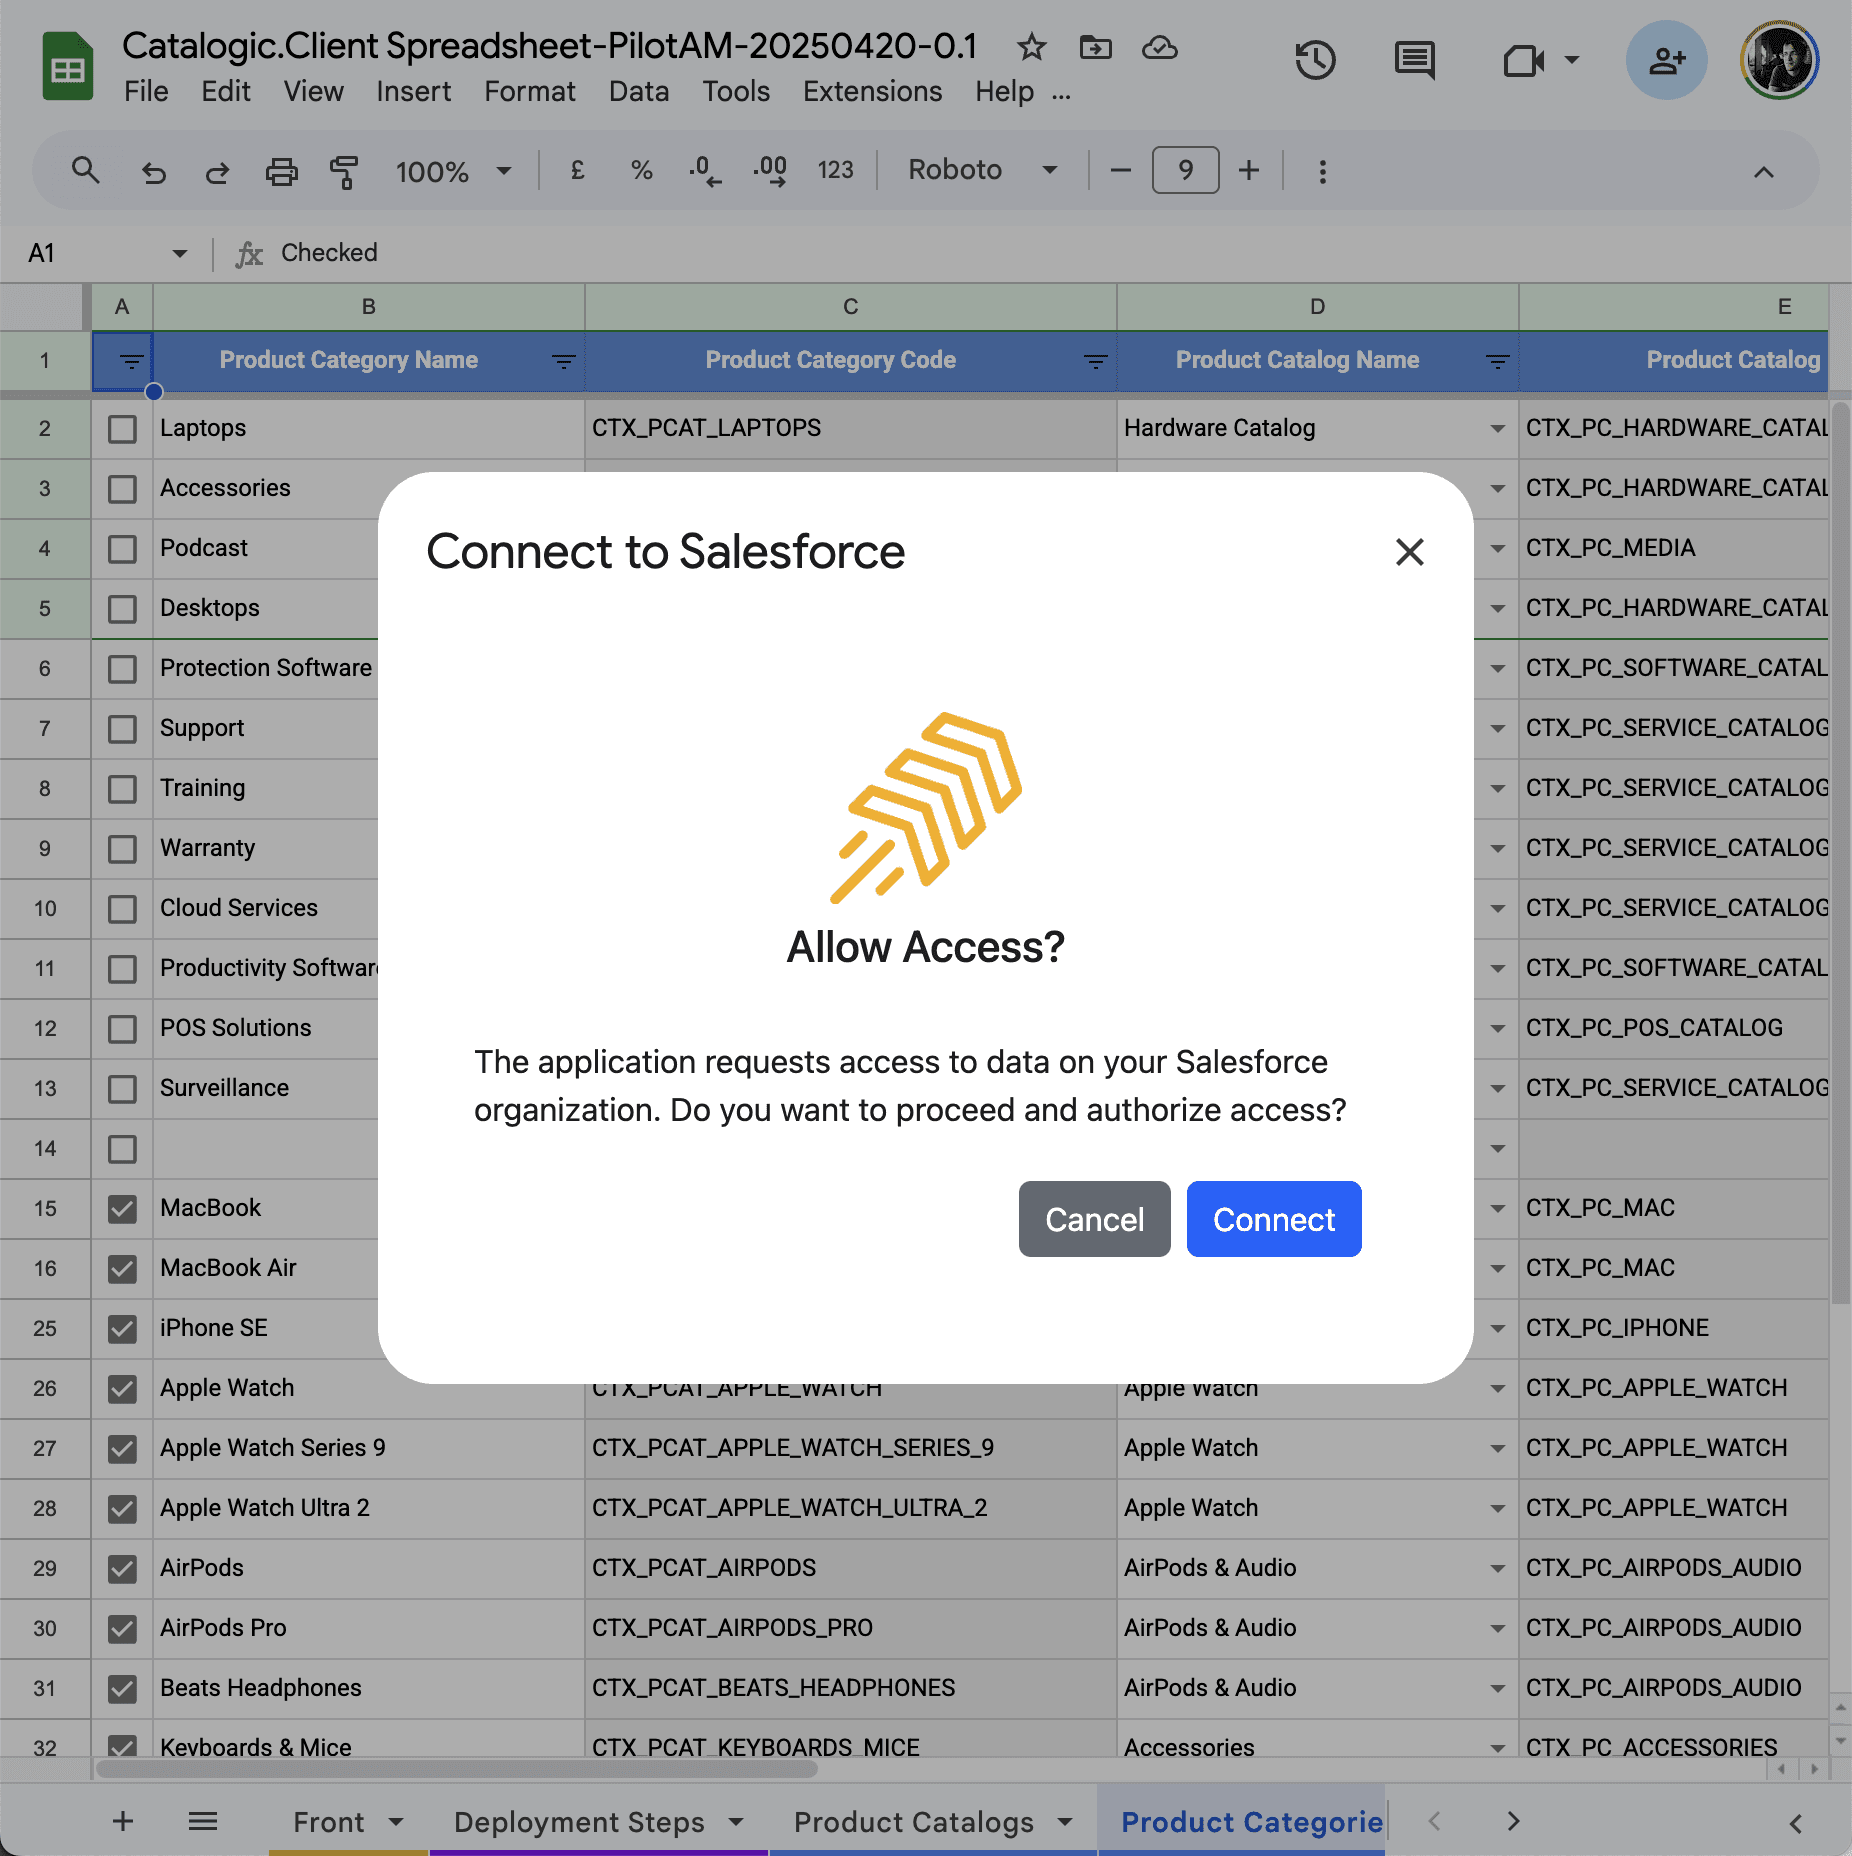
This will redirect you to a Salesforce authorization page where you’ll be prompted to allow access from the Catalogic spreadsheet application.
If you’re already logged in to a Salesforce org, it will use that session
If not, you will be prompted to log in.
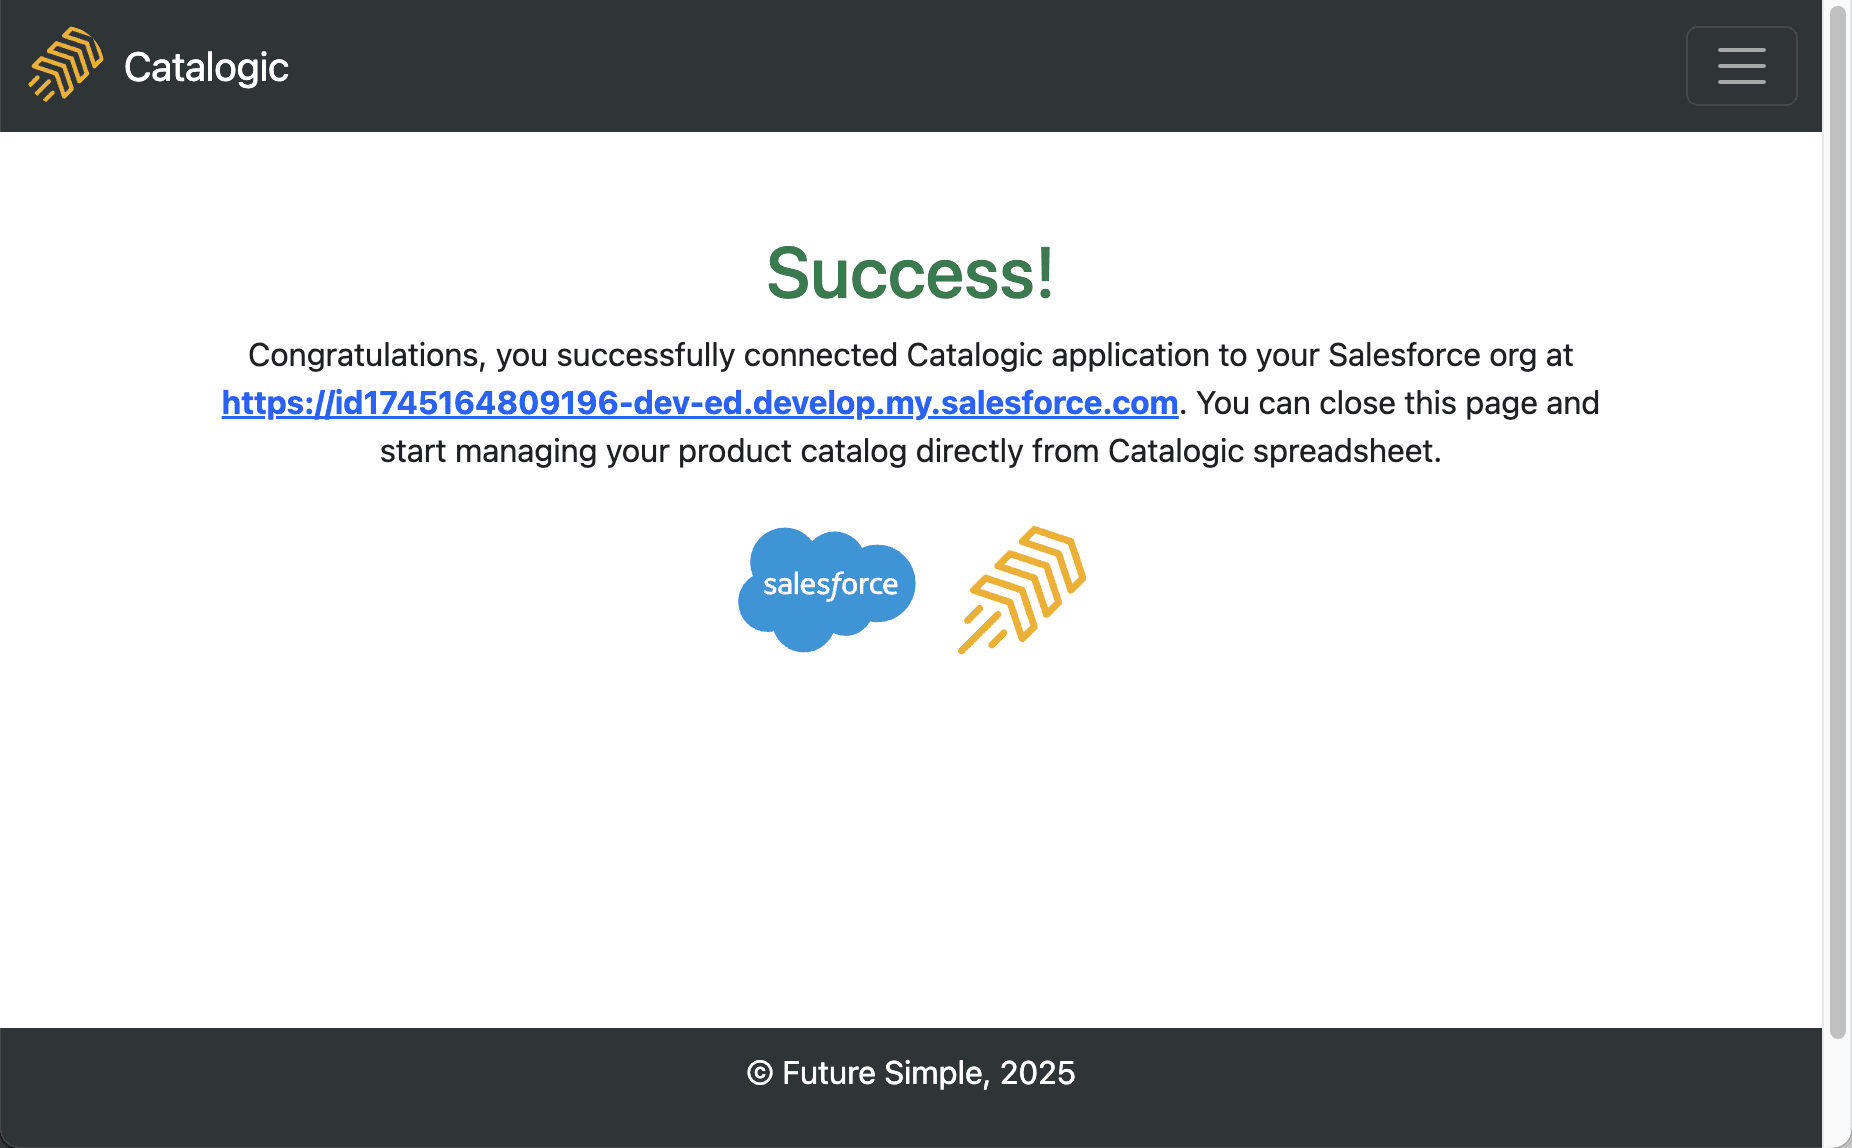
Successful Authorization
If the process completes successfully, you will be redirected to a confirmation page indicating the connection is established.
Unsuccessful Authorization
If the authorization fails, you will be redirected to a diagnostic page with error details.
Common issues include:
error=invalid_client_id
error=redirect_uri_mismatch
In these cases, wait a few minutes and try again — changes to the connected app in Salesforce may still be propagating.
Data Loading Test Run
With authorization complete, you can now test Catalogic’s ability to load data from the spreadsheet into your Salesforce organization. This simple test will confirm that the connection is working and that business logic in your org is ready to accept catalog data.
Step-by-Step Instructions
Open your Catalogic spreadsheet
Navigate to the Products tab
Check (tick) one of the rows that you want to load into Salesforce
From the menu bar, choose: Catalog Automation > Load only selected rows to Salesforce
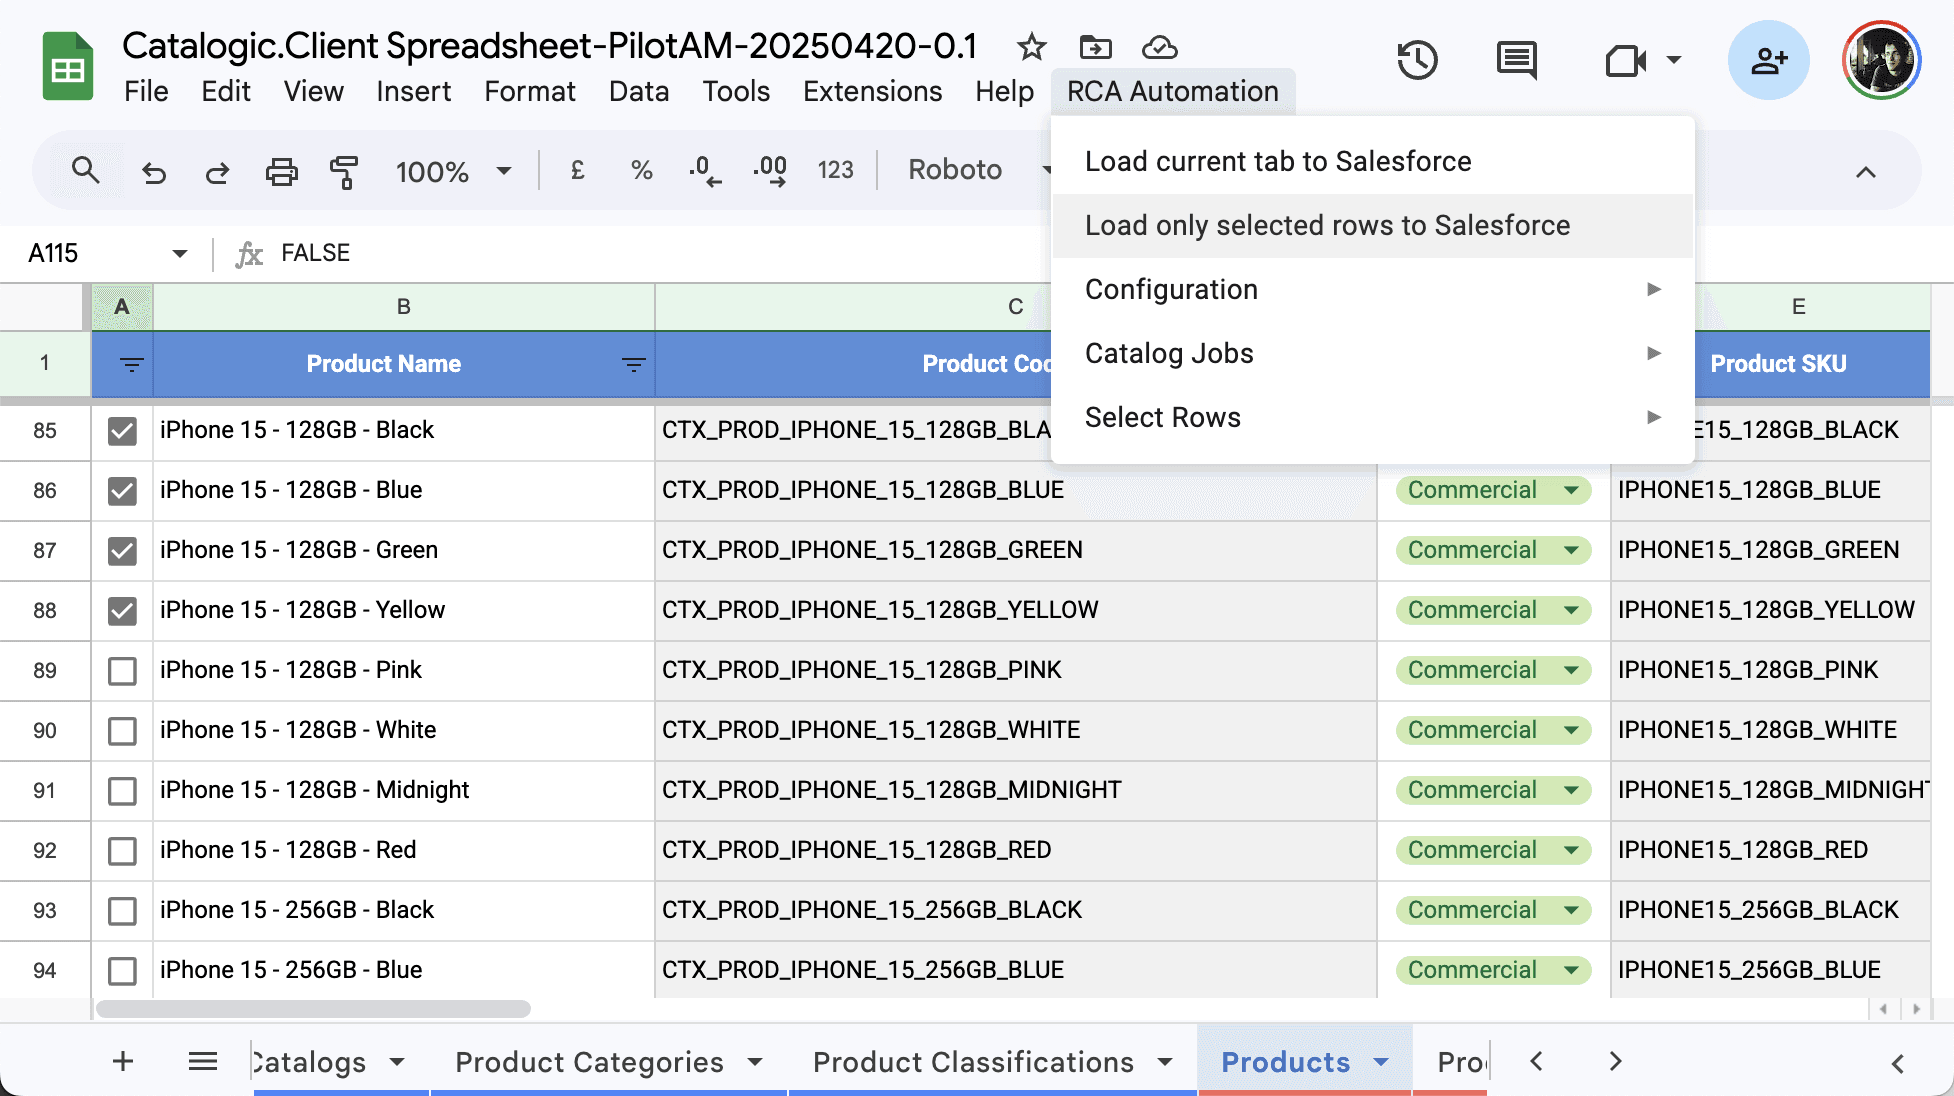
In the opened dialog, click the Load Data button
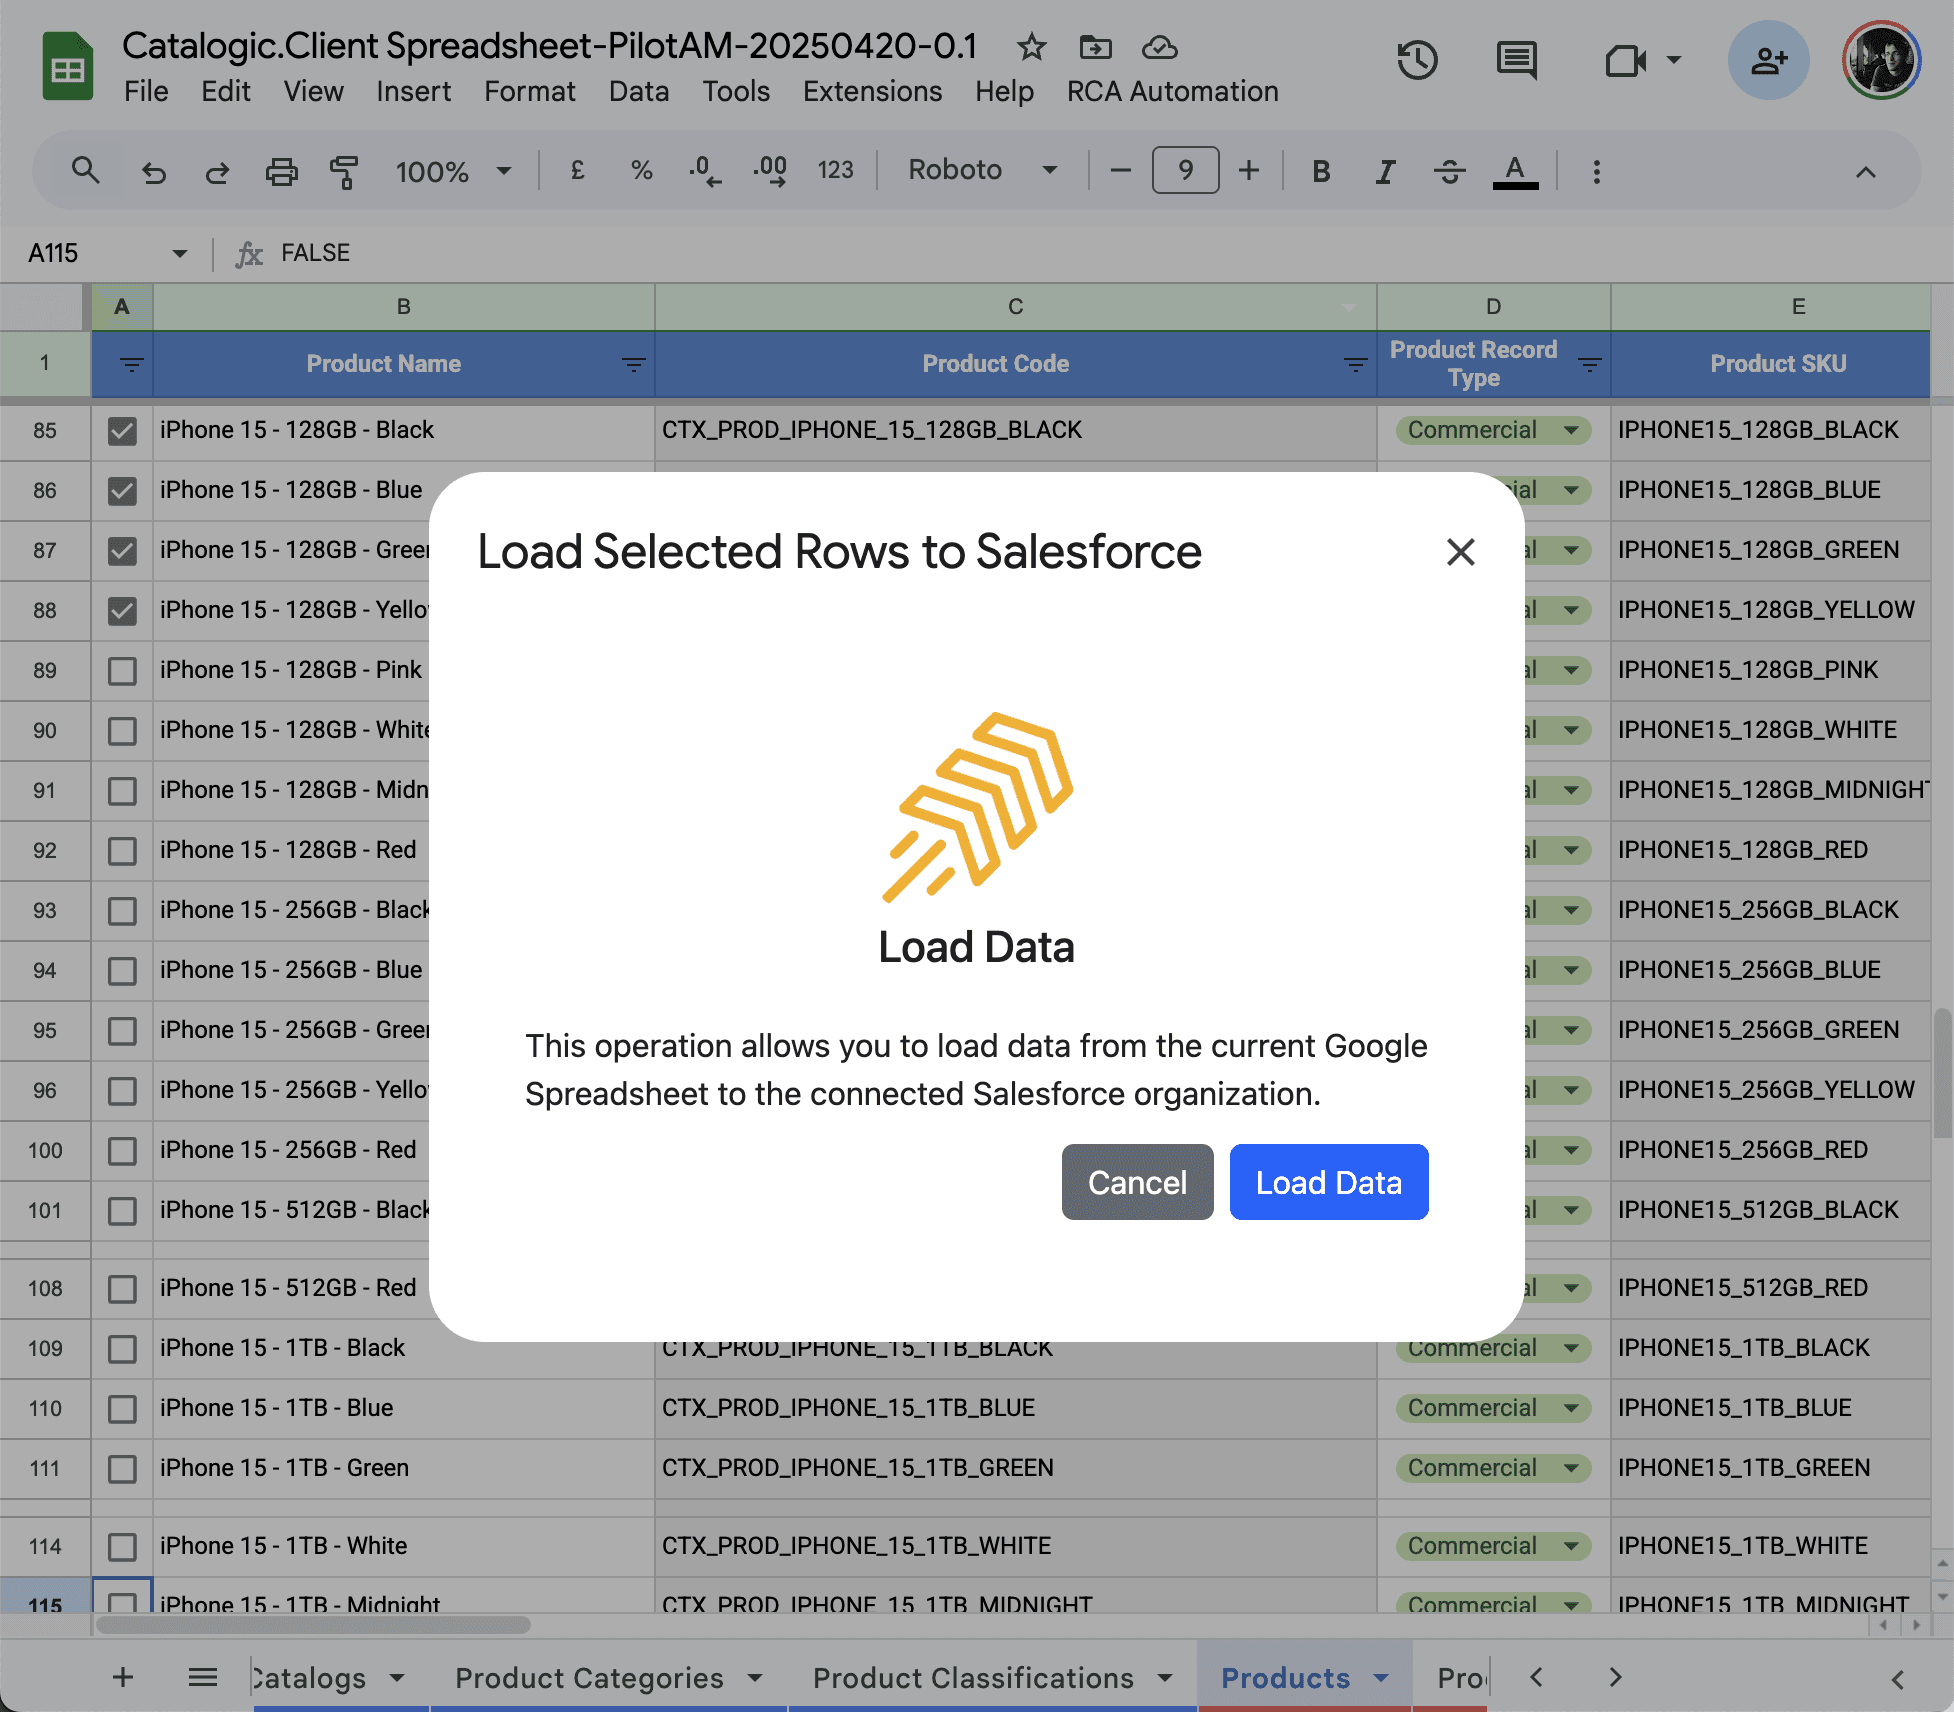
Wait for the process to complete
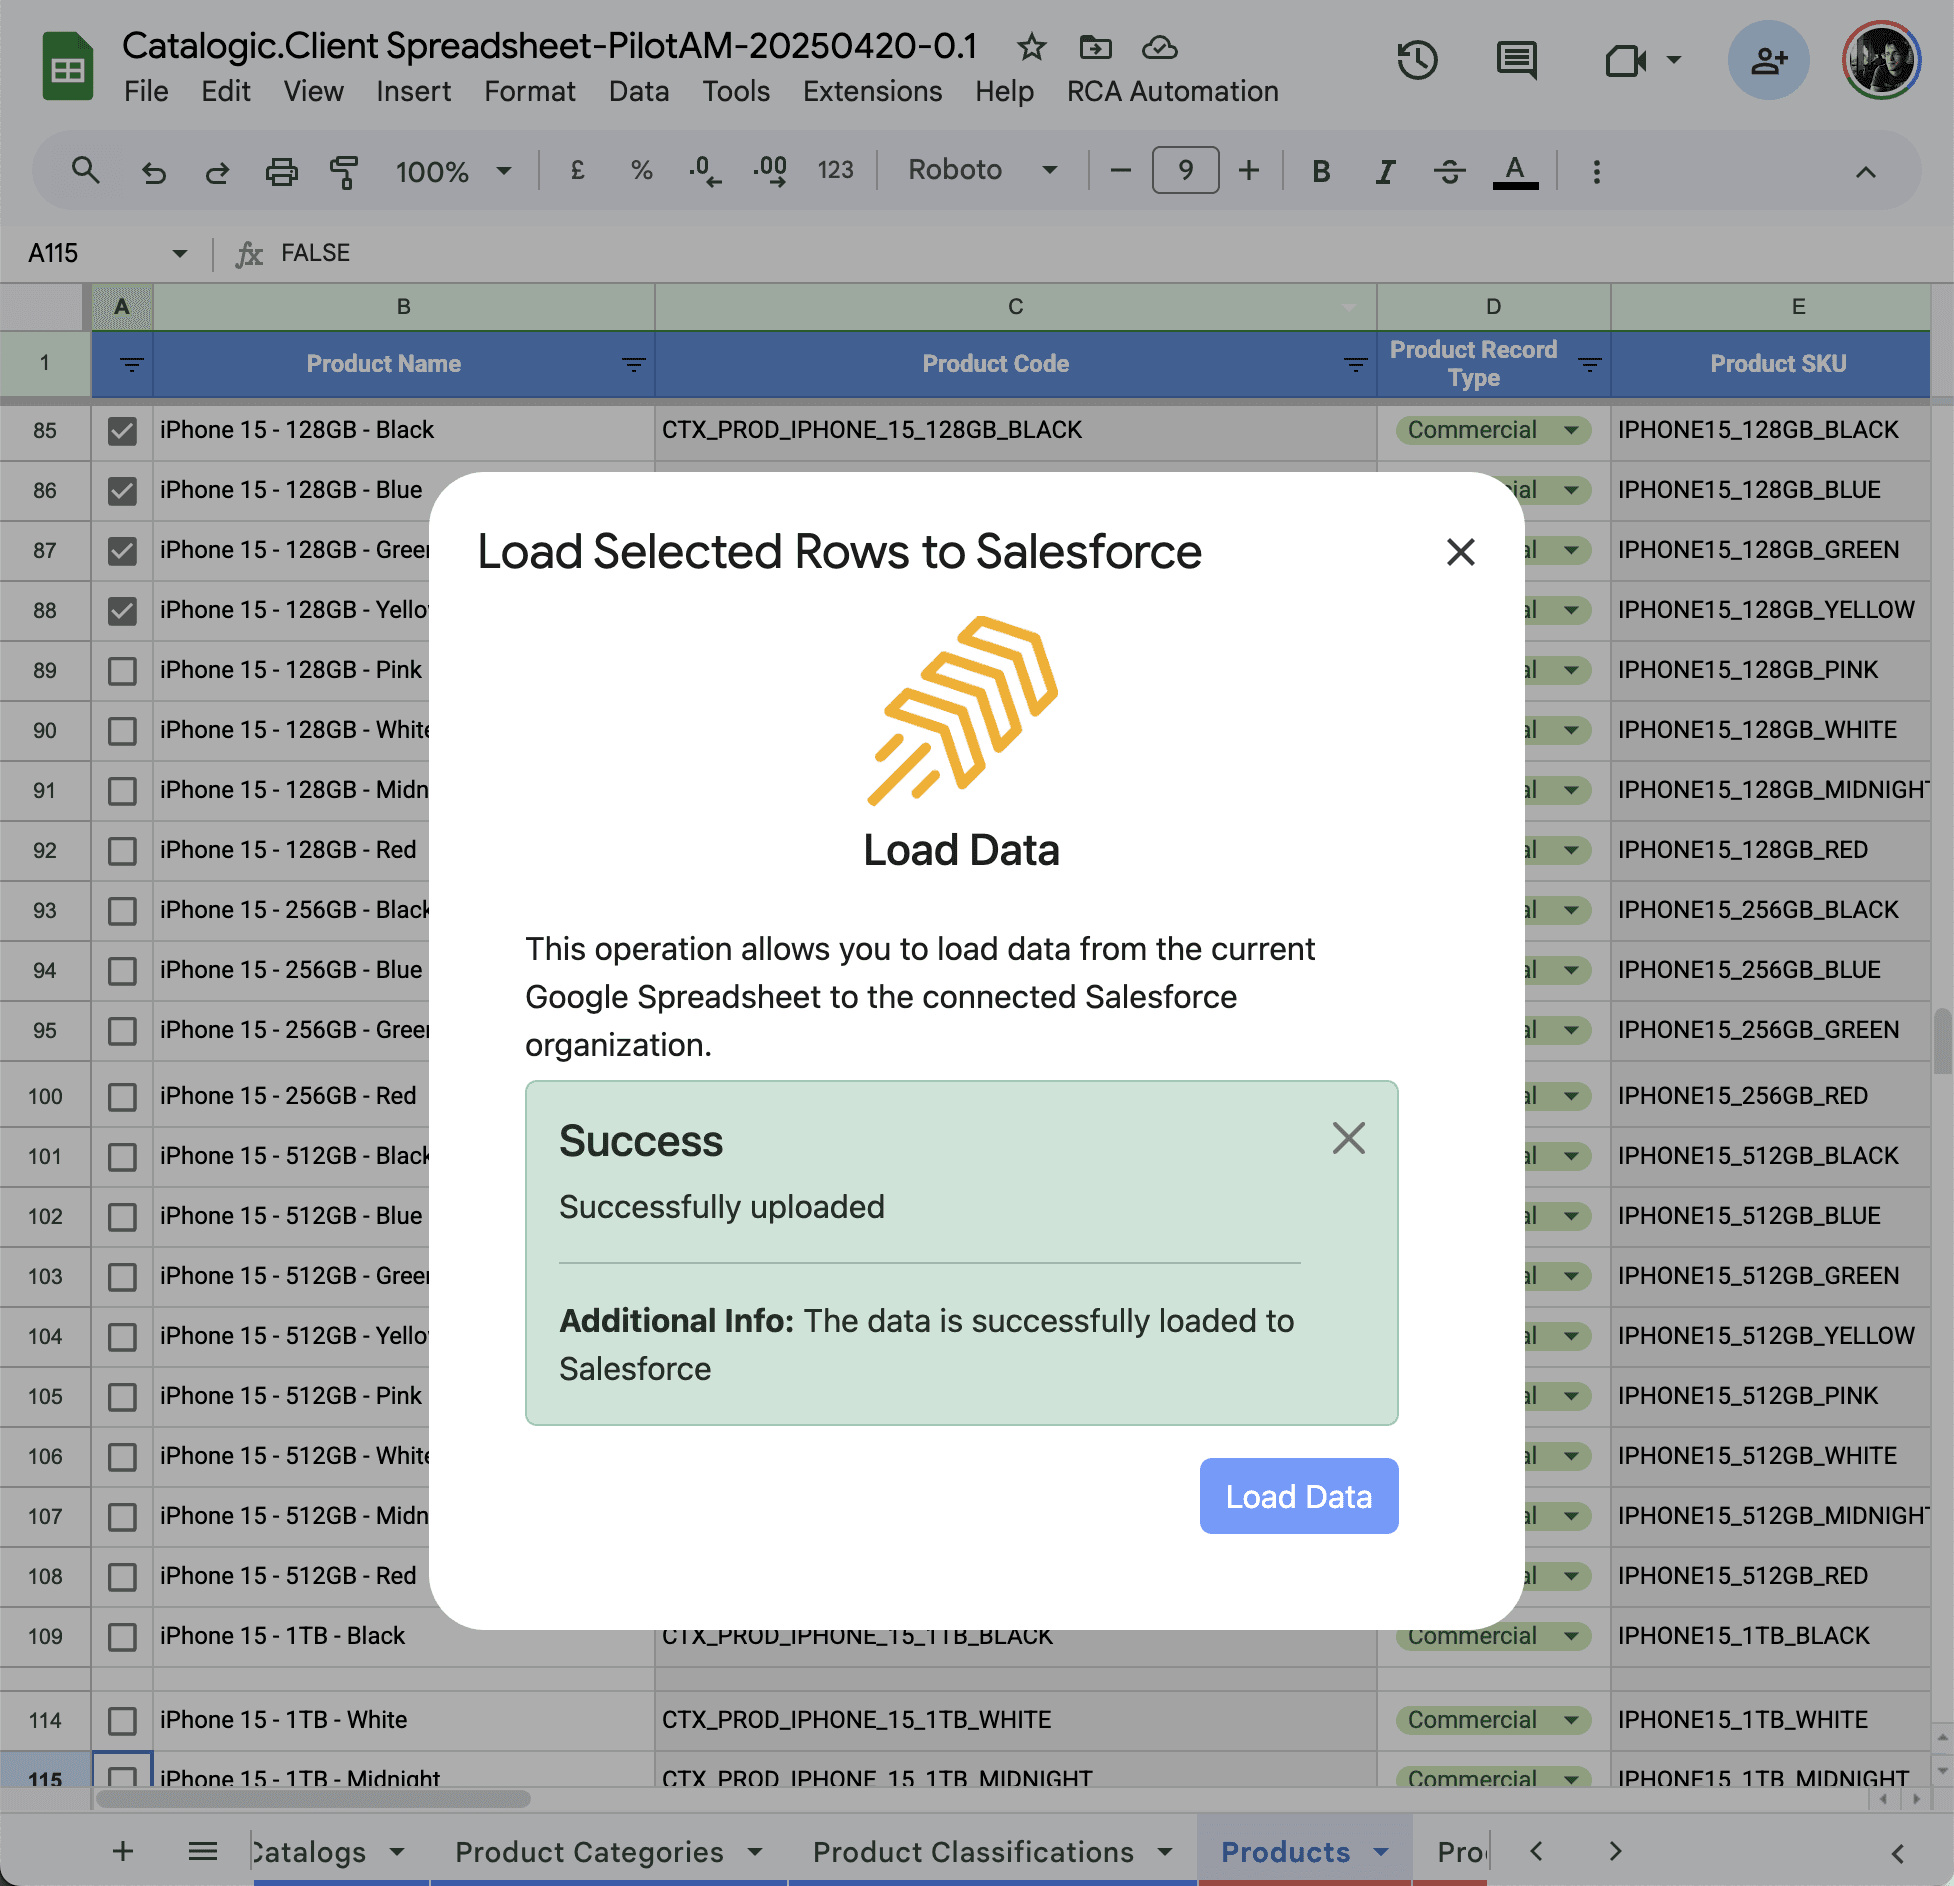
Open your Salesforce org and verify that the corresponding record was created or updated
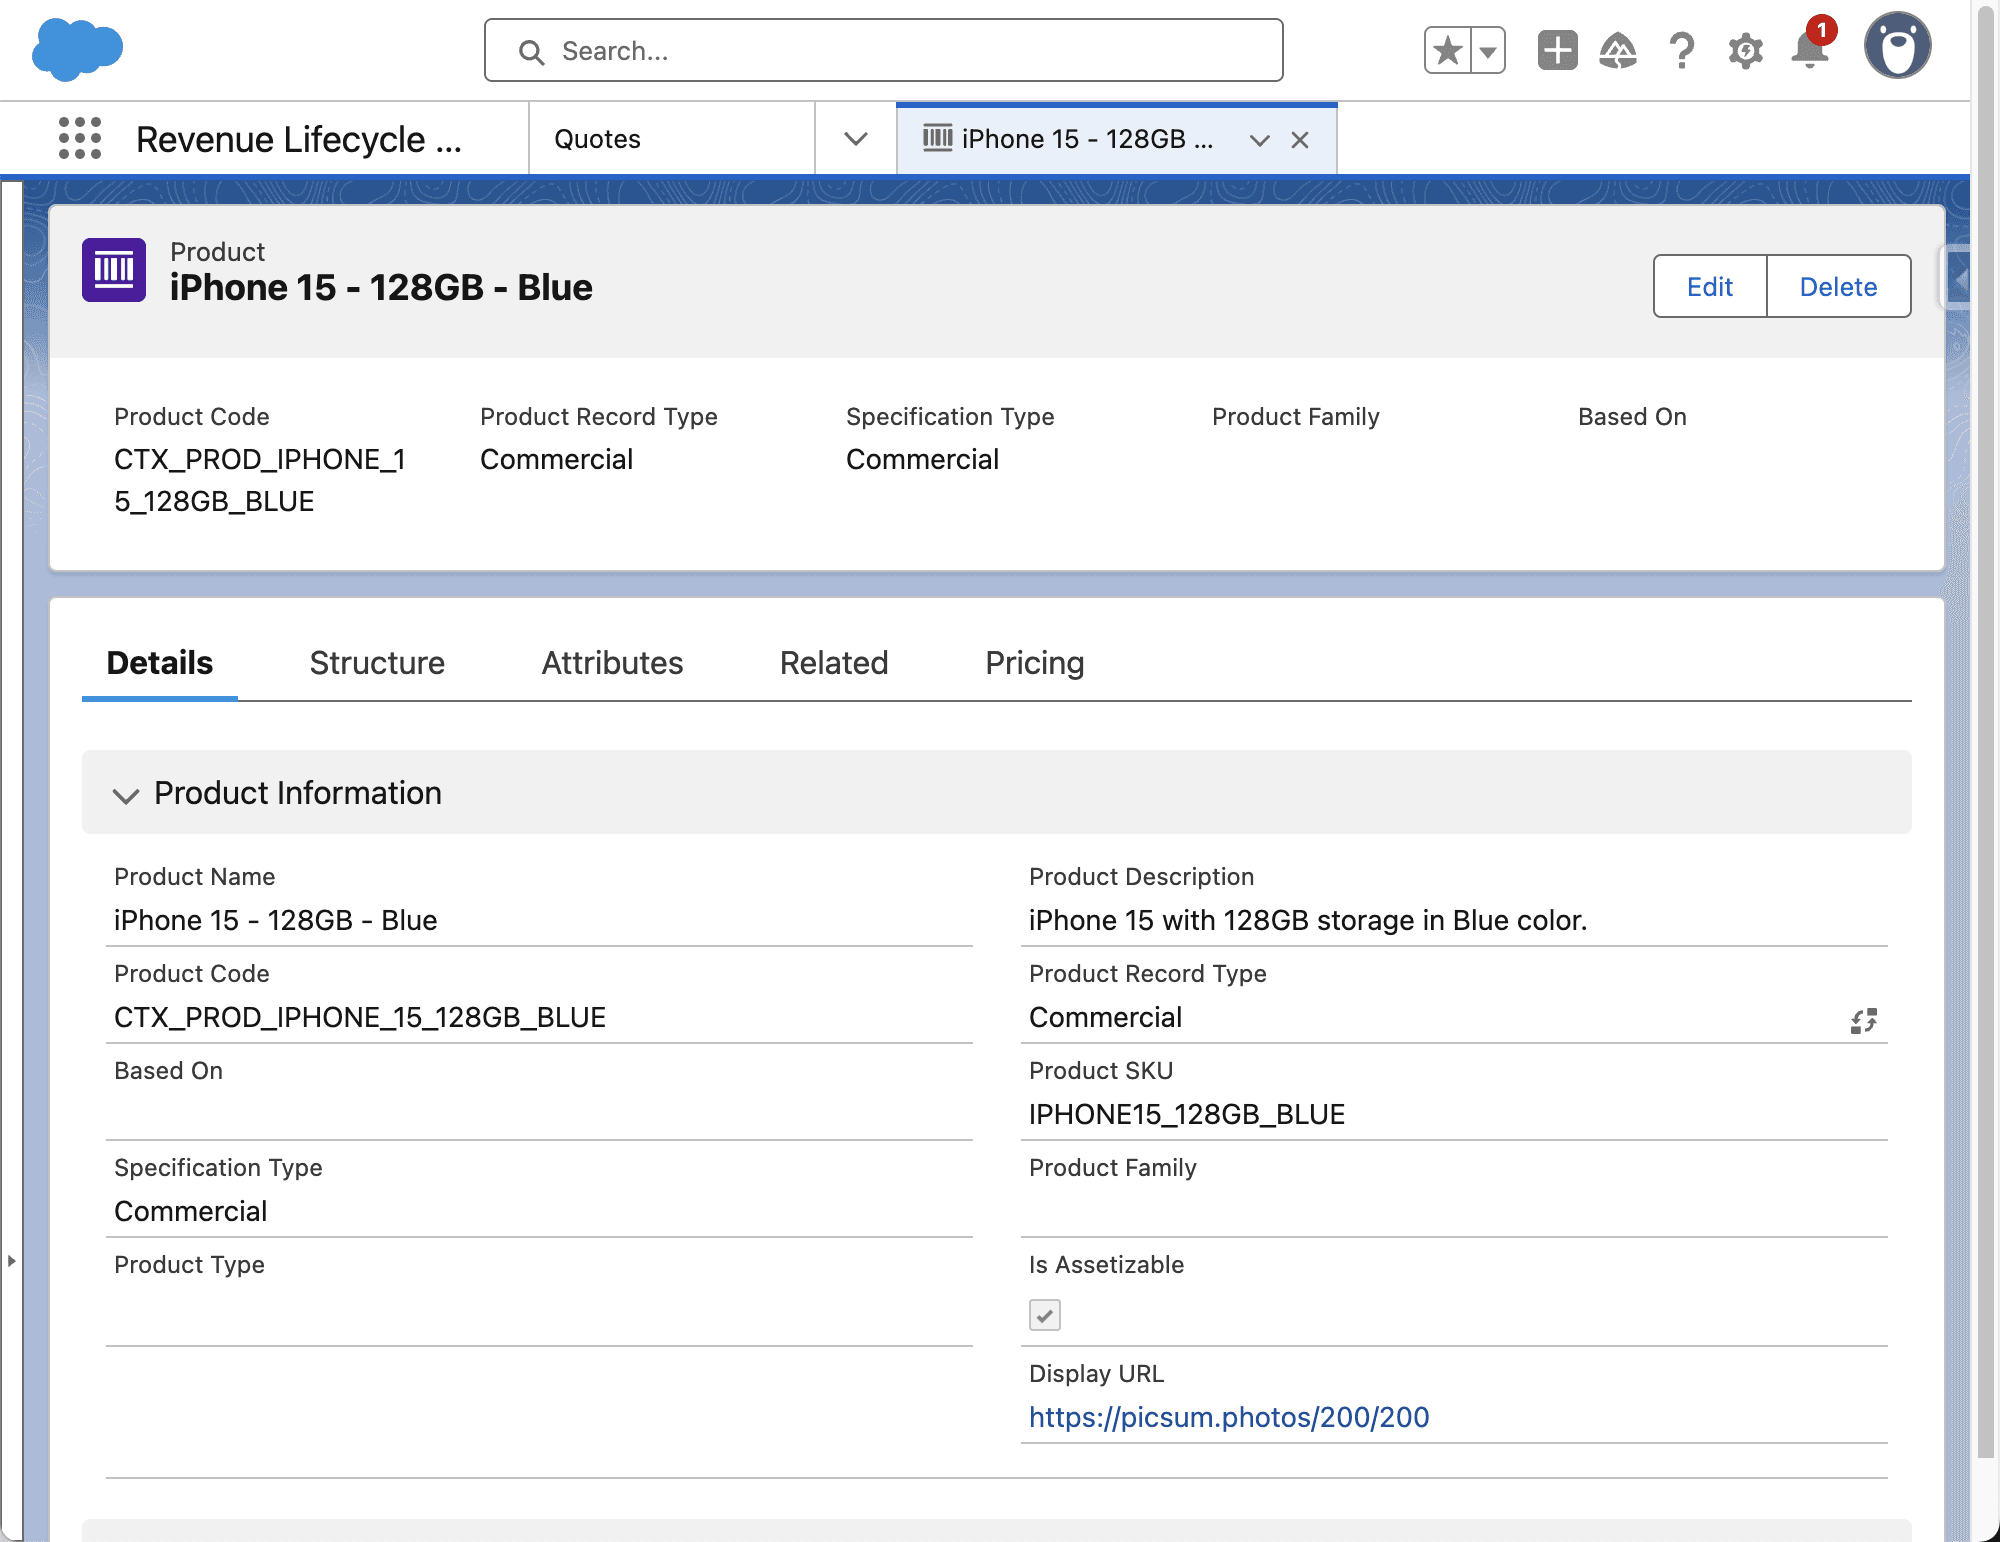
If the record appears in Salesforce, congratulations — your Catalogic setup is complete and functional.
You’re now ready to use the full capabilities of Catalogic to manage your product catalog.
Need Help?
If you need support, share your Catalogic spreadsheet with amorozov@futuresimple.nl.
Other Issues?
Your feedback is valuable, share your observation and Catalogic spreadsheet with amorozov@futuresimple.nl or using this form
Happy catalog management!